|
|
|
Kategorie
|
|
Informacje
|
|
Polecamy
|
|
|
 |
|
|
Dla tego produktu nie napisano jeszcze recenzji!
 ;
...instruction is ok.
...instrukcja jest ok.
Thanks/Dzięki
;
Documentation made available quickly and It is good quality. Thanks.
1 May 1993
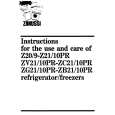
PAPER FEED
5.11 3RD PAPER FEED CLUTCH REPLACEMENT (A111 Copier Only)
[G] [F]
[B] [H] [C]
[A]
[E]
[D] [I]
1. Turn off the main switch. 2. Remove the rear cover (4 screws). 3. Unhook the spring [A] from the tension pulley bracket [B]. 4. Remove the drive belt [C] from the drive pulley [D]; then remove the pulley (1 E-ring). 5. Remove the 3rd paper feed clutch bracket [E] (2 E-rings and bushings and 3 screws). 6. Replace the 3rd paper feed clutch [F] (1 connector). NOTE: a) When the clutch is installed, make sure that the stopper [G] on the bracket fits into the slot on the clutch as shown. b) When the clutch is installed, make sure that the 3rd feed rollers are facing up. If not, rotate the shaft [H]. c) When the drive belt is installed, make sure that the belt stoppers [I] of the drive pulleys are positioned correctly as shown. This is to prevent the drive belt from coming off the pulleys.
Replacement Adjustment
5-53
|
|
|
> |
|