|
Dla tego produktu nie napisano jeszcze recenzji!
 ;
...instrukcja serwisowa w pełni czytelna i kompletna. Dziękuję!
;
Instrukcja Serwisowa jest kompletna i czytelna. Dziękuję!
 ;
Wszystko OK!
Dokumentacja jest czytelna.
Dziękuję.
;
Bardzo dobra jakość skanu, przystępna cena. Instrukcja serwisowa okazała się przydatna przy "reanimowaniu" dwudziestoparoletniego decka, który teraz pięknie gra :)
;
...instruction is ok.
...instrukcja jest ok.
Thanks/Dzięki
GS-XP07ER�GU-XR07ER GS-XP09ER�GU-XR09ER GS-XP12ER�GU-XR12ER
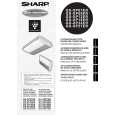
How to disassemble the Fan motor.
1. Remove 3 Fan housings (Remove the nails of both sides).
NAIL
4. Tilt the Fan motor ass'y around the Bearing, remove it. CAUTION: DO NOT HIT FANS AGAINST FAN HOUSING.
1
2
5. Remove 2 screws fixing the Fan and Joint with hexagon socket screw key (Diagonally 3mm).
Fan housing
2. Remove the Fan motor lead wires from the Wire clamps.
CAUTION: WHEN YOU ASSEMBLE THE FAN MOTOR ASS'Y TO UNIT, YOU DO NOT MAKE THE FANS TOUCH THE FAN HOUSINGS. AFTER ASSEMBLY OF THE FAN MOTOR ASS'Y MAKE SURE THAT THE FAN HAS NOT TOUCHED THE FAN HOUSING.
How to disassemble the Louver motor.
3. Support the Fan motor with your hand, and remove 2 screws fixing Fan motor clamps. Remove 2 Fan motor clamps. 1. Disconnect the connector (CN205). Remove 2 screws fixing the Louver motor.
35
|