KXTS400W Ilość: 1
$4.99
» Pokaż Szczegóły
GC1530/12 Ilość: 1
$4.99
» Pokaż Szczegóły
SF 904 AV Ilość: 1
$4.99
» Pokaż Szczegóły
FT-2 Ilość: 1
$4.99
» Pokaż Szczegóły
LB-K4880BL Ilość: 1
$4.99
» Pokaż Szczegóły
QR2229W Ilość: 1
$4.99
» Pokaż Szczegóły
PVDF2003K Ilość: 1
$4.99
» Pokaż Szczegóły
GCX 5582 Ilość: 1
$4.99
» Pokaż Szczegóły
CT2867 Ilość: 1
$4.99
» Pokaż Szczegóły
EHS6695X Ilość: 1
$4.99
» Pokaż Szczegóły
AKP 249/IX Ilość: 1
$4.99
» Pokaż Szczegóły
DIAMANT 710.0 Ilość: 1
$4.99
» Pokaż Szczegóły
AKL 446/IX Ilość: 1
$4.99
» Pokaż Szczegóły
2ART0NGCPT03 Ilość: 1
$4.99
» Pokaż Szczegóły
D8854/30 Ilość: 1
$4.99
» Pokaż Szczegóły
IV 2058/2 L Ilość: 1
$4.99
» Pokaż Szczegóły
HK5495I Ilość: 1
$4.99
» Pokaż Szczegóły
BRISTOL S Ilość: 1
$4.99
» Pokaż Szczegóły
SPD5125CC/05 Ilość: 1
$4.99
» Pokaż Szczegóły
A515 Ilość: 1
$4.99
» Pokaż Szczegóły
TD6626/BE089P Ilość: 1
$4.99
» Pokaż Szczegóły
AG5210P Ilość: 1
$4.99
» Pokaż Szczegóły
VCR8200 Ilość: 1
$4.99
» Pokaż Szczegóły
JOG30000X Ilość: 1
$4.99
» Pokaż Szczegóły
CS-SC24ATN5 Ilość: 1
$4.99
» Pokaż Szczegóły
KD6122BUU/A04 Ilość: 1
$4.99
» Pokaż Szczegóły
Lavamat 6450 Sens Ilość: 1
$4.99
» Pokaż Szczegóły
PA26SM Ilość: 1
$4.99
» Pokaż Szczegóły
GSX 5421/1 Ilość: 1
$4.99
» Pokaż Szczegóły
H53 Ilość: 1
$4.99
» Pokaż Szczegóły
LBR6233AW1 Ilość: 1
$4.99
» Pokaż Szczegóły
ST632002 Ilość: 1
$4.99
» Pokaż Szczegóły
TRA 5120 Ilość: 1
$4.99
» Pokaż Szczegóły
C72 Ilość: 1
$4.99
» Pokaż Szczegóły
OV C40 S Ilość: 1
$4.99
» Pokaż Szczegóły
W sumie: $174.65
 
English Polski Spanish 
Szukaj instrukcji do
 

(e.g. AA-V20EG JVC, ZX-7 Sony )
PayPal 1000+ rating Secure, Encrypted Checkout.
 
Kategorie
Informacje
Polecamy
Strona główna >> GRUNDIG >> GV6263HIFI Instrukcja Serwisowa
 
 35 szt. w koszyku 

GRUNDIG GV6263HIFI
Instrukcja Serwisowa


Tweetnij o tym produkcie a dostaniesz $1.00 rabatu!
  • Zawiera schematy
  • Plik do pobrania
  • Format PDF
  • Kompletna instrukcja
  • Język: English, German
Cena: $4.99

Opis GRUNDIG GV6263HIFI Instrukcja Serwisowa

Kompletna instrukcja serwisowa w formie pliku PDF. Instrukcje serwisowe zazwyczaj zawierają schematy, diagramy drukowanych obwodów (PCB), schematy połączeń, schematy blokowe oraz katalog części. Instrukcje serwisowe są wykorzystywane glównie przez osoby naprawiające uszkodzony sprzęt.

Jeśli chcesz się dowiedzieć jak się obsługuje Twój telewizor, magnetowid, odtwarzacz mp3 itp. powinieneś raczej szukać instrukcji obsługi

Instrukcja jest dostępna w następujących językach: English, German

Plik nie jest jeszcze gotowy
Musisz najpierw dokonać zakupu.

Recenzje produktu
Dla tego produktu nie napisano jeszcze recenzji!
Recenzje innych produktów
 RSB106 PANASONIC Instrukcja Serwisowa by Mieczyslaw Wojdyla;
Bardzo dobra jakość skanu, przystępna cena. Instrukcja serwisowa okazała się przydatna przy "reanimowaniu" dwudziestoparoletniego decka, który teraz pięknie gra :)
 ST-8077K TECHNICS Instrukcja Serwisowa by Adam Grążka;
...instruction is ok. ...instrukcja jest ok. Thanks/Dzięki
 T5 SANSUI Instrukcja Serwisowa by Adam Grążka;
Documentation made ​​available quickly and It is good quality. Thanks.

Tekstowy podgląd strony 63 (kliknij aby zobaczyć)
GV 32�, GV 52�, GV 62�

Drive Mechanism

3. Disassembly Instructions
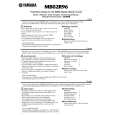
3.1 Loading motor � Undo the screw A (Fig. 3). � Remove the loading motor (B410, Fig. 3) to the rear. Fig. 6
K530 G546

H

B410

A
B448 B452

Fig. 7
B452

Fig. 3
K470

A B448

3.5 AC combi head � Undo the plug connectors if necessary. � Undo the screw I (Fig. 8) then remove the AC combi head (G480). Reassembly is carried out in reverse order. Note on reassembly: � After replacing the combi head all adjustments described in the points 4.2, 4.3 and 4.4 must be carried out.

3.2 Cassette lift � Move the drive mechanism to the "Eject" position for removing the cassette lift: � Remove the loading motor (point 3.1). � Turn the white gear joint (B448, Fig. 3) counterclockwise until the cassette lift is in the "Eject" position. � Tense the spring-loaded lift lever B (Fig. 4), release the catch C then remove the cassette lift (K490, Fig. 1). Note on reassembly: � Insert the cassette lift so that the two left guide pins D (Fig. 5) engage into the lift guides of the lift lever (K530) and in the frame. � Tense the spring-loaded lift lever B (Fig. 4), release the catch C then insert the cassette lift into the right guide of the lift lever.

I
G480
A B

K

C

C

Fig. 8

D E F B Fig. 4 Fig. 5
B560
K490 K530

3.3 Lift lever � Remove the cassette lift (point 3.2). � Disengage the locking lug of the lift lever one after the other through the holes E (Fig. 5) and F then remove the lift lever (K530). 3.4 Lift drive � Remove the lift lever (point 3.3). � Slide the lift slider (K470, Fig. 3) to the cam wheel (B452) and remove the door opening lever (546). � Slide the lift slider (K470, Fig. 3) to the front then remove it. � Remove the black cam wheel (B452, Fig. 3) and the white gear joint (B448). Note on reassembly: � Insert the white gear joint (B448, Fig. 3). � Insert the cam wheel (B452, Fig. 7) with the drive mechanism in unthread position so that the mark A points towards the shaft of the white gear joint (B448). � Insert the lift slider (K470, Fig. 3), press on the cam wheel (B452) then slide it backwards. � Insert the door opening lever (G546) so that the guide of the right side part engages into the guide groove H (Fig. 6). � Reassembly is carried out in reverse order.

3.6 Capstan motor � Remove the reel belt (G542, Fig. 2). � Undo the plug connectors if necessary. � Undo the 3 screws K (Fig. 8). � Remove the capstan motor (B560, Fig. 8) from the drive mechanism. Make sure that the capstan does not touch greased parts of the drive mechanism. Reassembly is carried out in reverse order. Make sure that the capstan is free of grease (clean it if necessary). 3.7 Tape drum unit � Undo the plug connectors if necessary. � Undo the 3 screws L (Fig. 9). � Remove the ground plate (Fig. 9). � Remove the tape drum unit (G001, Fig. 9) carefully from the drive mechanism. Reassembly is carried out in reverse order. Adjustments and checks after replacement � Check the tape transport (point 4.7.3). � Adjust the tape drum position indicator (Adjustment No.1, page 2-2).

GRUNDIG Service

4-7

Klienci kupując ten produkt kupili także

$4.99

SX-K700 TECHNICS
Instrukcja Obsługi

Kompletna instrukcja obsługi w formie pliku PDF. Plik PDF zostanie dostarczony na Twój adres email…

$4.99

CJ-V51 PIONEER
Instrukcja Serwisowa

Kompletna instrukcja serwisowa w formie pliku PDF. Instrukcje serwisowe zazwyczaj zawierają schemat…

$4.99

GRAND PRIX ELECTRONIC 754 BECKER
Instrukcja Serwisowa

Kompletna instrukcja serwisowa w formie pliku PDF. Instrukcje serwisowe zazwyczaj zawierają schemat…

$4.99

SX-PR602 TECHNICS
Instrukcja Serwisowa

Kompletna instrukcja serwisowa w formie pliku PDF. Instrukcje serwisowe zazwyczaj zawierają schemat…

$4.99

EV-S1000E SONY
Instrukcja Obsługi

Kompletna instrukcja obsługi w formie pliku PDF. Plik PDF zostanie dostarczony na Twój adres email…

$4.99

GRAND PRIX ELECTRONIC 780 BECKER
Instrukcja Serwisowa

Kompletna instrukcja serwisowa w formie pliku PDF. Instrukcje serwisowe zazwyczaj zawierają schemat…

$4.99

AG7330 PANASONIC
Instrukcja Serwisowa

Kompletna instrukcja serwisowa w formie pliku PDF. Instrukcje serwisowe zazwyczaj zawierają schemat…

$4.99

MECABLITZ 60 CT4 METZ
Instrukcja Serwisowa

Kompletna instrukcja serwisowa w formie pliku PDF. Instrukcje serwisowe zazwyczaj zawierają schemat…
>
Parse Time: 0.35 - Number of Queries: 263 - Query Time: 0.145