170S PORTI Ilość: 1
$4.99
» Pokaż Szczegóły
ELK 695-1 Ilość: 1
$4.99
» Pokaż Szczegóły
KUDP230Y2 Ilość: 1
$4.99
» Pokaż Szczegóły
ET16JKXSW02 Ilość: 1
$4.99
» Pokaż Szczegóły
PHOTON19VISION Ilość: 1
$4.99
» Pokaż Szczegóły
GR-SX850U Ilość: 1
$4.99
» Pokaż Szczegóły
29PT458A/78R Ilość: 1
$4.99
» Pokaż Szczegóły
LT-Z37SX5/A Ilość: 1
$4.99
» Pokaż Szczegóły
E33002-D Ilość: 1
$4.99
» Pokaż Szczegóły
7646802010 Ilość: 1
$4.99
» Pokaż Szczegóły
KSB5MC4 Ilość: 1
$4.99
» Pokaż Szczegóły
WAE 9610 Ilość: 1
$4.99
» Pokaż Szczegóły
AZ2415/17S Ilość: 1
$4.99
» Pokaż Szczegóły
GD5SHAXLT01 Ilość: 1
$4.99
» Pokaż Szczegóły
CX2645 Ilość: 1
$4.99
» Pokaż Szczegóły
RCS3004GV0 Ilość: 1
$4.99
» Pokaż Szczegóły
PCGF560K Ilość: 1
$4.99
» Pokaż Szczegóły
KSSP42QHW00 Ilość: 1
$4.99
» Pokaż Szczegóły
TUPTA100E Ilość: 1
$4.99
» Pokaż Szczegóły
GR-L247 Ilość: 1
$4.99
» Pokaż Szczegóły
HBN G750 W Ilość: 1
$4.99
» Pokaż Szczegóły
PET725 Ilość: 1
$4.99
» Pokaż Szczegóły
RCDW10 Ilość: 1
$4.99
» Pokaż Szczegóły
AV28BT80EN Ilość: 1
$4.99
» Pokaż Szczegóły
RMV60 Ilość: 1
$4.99
» Pokaż Szczegóły
M-2600 Ilość: 1
$4.99
» Pokaż Szczegóły
SP3220UV Ilość: 1
$4.99
» Pokaż Szczegóły
ÖKO_SANTO.4088-4.KG Ilość: 1
$4.99
» Pokaż Szczegóły
IUD6000RQ3 Ilość: 1
$4.99
» Pokaż Szczegóły
KKV90 21 Ilość: 1
$4.99
» Pokaż Szczegóły
DP 3230 Ilość: 1
$4.99
» Pokaż Szczegóły
SM-Q300B Ilość: 1
$4.99
» Pokaż Szczegóły
HSTA23 Ilość: 1
$4.99
» Pokaż Szczegóły
19A580BQ11 Ilość: 1
$4.99
» Pokaż Szczegóły
70FA443 Ilość: 1
$4.99
» Pokaż Szczegóły
KMV7EG Ilość: 1
$4.99
» Pokaż Szczegóły
P MAX 169 Ilość: 1
$4.99
» Pokaż Szczegóły
ZBG509SS Ilość: 1
$4.99
» Pokaż Szczegóły
CDX-FM61 Ilość: 1
$4.99
» Pokaż Szczegóły
KESC307BAL4 Ilość: 1
$4.99
» Pokaż Szczegóły
AQ4010/05 Ilość: 1
$4.99
» Pokaż Szczegóły
MA230 Ilość: 1
$4.99
» Pokaż Szczegóły
RH468D Ilość: 1
$4.99
» Pokaż Szczegóły
NVSD420B Ilość: 1
$4.99
» Pokaż Szczegóły
CC2422P Ilość: 1
$4.99
» Pokaż Szczegóły
8002010002 Ilość: 1
$4.99
» Pokaż Szczegóły
XR-M131C Ilość: 1
$4.99
» Pokaż Szczegóły
SIE424S Ilość: 1
$4.99
» Pokaż Szczegóły
W sumie: $239.52
 
English Polski Spanish 
Szukaj instrukcji do
 

(e.g. AA-V20EG JVC, ZX-7 Sony )
PayPal 1000+ rating Secure, Encrypted Checkout.
 
Kategorie
Informacje
Polecamy
Strona główna >> JVC >> HRJ3008UM Instrukcja Serwisowa
 
 48 szt. w koszyku 

JVC HRJ3008UM
Instrukcja Serwisowa


Tweetnij o tym produkcie a dostaniesz $1.00 rabatu!
  • Zawiera schematy
  • Plik do pobrania
  • Format PDF
  • Kompletna instrukcja
  • Język: English
Cena: $4.99

Opis JVC HRJ3008UM Instrukcja Serwisowa

Kompletna instrukcja serwisowa w formie pliku PDF. Instrukcje serwisowe zazwyczaj zawierają schematy, diagramy drukowanych obwodów (PCB), schematy połączeń, schematy blokowe oraz katalog części. Instrukcje serwisowe są wykorzystywane glównie przez osoby naprawiające uszkodzony sprzęt.

Jeśli chcesz się dowiedzieć jak się obsługuje Twój telewizor, magnetowid, odtwarzacz mp3 itp. powinieneś raczej szukać instrukcji obsługi

Instrukcja jest dostępna w następujących językach:

Plik nie jest jeszcze gotowy
Musisz najpierw dokonać zakupu.

Recenzje produktu
Dla tego produktu nie napisano jeszcze recenzji!
Recenzje innych produktów
 SA-A30E AIWA Instrukcja Serwisowa by Adam Grążka;
Wszystko w porządku. Instrukcja czytelna i kompletna. Dziękuję. all right! thank you.
 KX990SR KENWOOD Instrukcja Serwisowa by Viktor Kapeć;
Bardzo dobra instrukcja. Zawiera wszystko co potrzeba, polecam!
 TA2760 ONKYO Instrukcja Serwisowa by Viktor Kapeć;
Instrukcja jest OK. Schematy czytelne, opisane niektóre procedury.
 26PF3302/10 PHILIPS Instrukcja Serwisowa by Ryszard Burzak;
Instrukcja bardzo czytelna. zawiera co potrzeba. Polecam
 DX666 AIWA Instrukcja Serwisowa by Adam Grążka;
...instrukcja serwisowa w pełni czytelna i kompletna. Dziękuję!

Tekstowy podgląd strony 12 (kliknij aby zobaczyć)
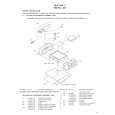
Loading motor board assembly Loading motor Lugs Motor guide

6.5 ± 0.2 mm
LABEL

2. How to install (Centering the mounting position) When the capstan motor has once been removed and then reinstalled out of the initial correct position in the rotational direction, the capstan motor current may be unstable during operation in high or low temperatures. This may result in greater Wow & Flutter and occasionally in power breakdown because of current over - load. Install the capstan motor while following the procedure given below. (The capstan motor is centrally located when the unit is shipped from the factory.) (1) Provisionally tighten the three screws (A) securing the capstan motor. (2) Install the mechanism assembly to which the capstan motor is provisionally fastened on the bottom chassis which incorporates the Main board assembly. (No need to tighten the screws for mounting the mechanism.) Make sure that all the connectors for the mechanism assembly and the Main board assembly are correctly installed as indicated in Fig. 2-2-8b. (3) Making sure that the connector for the capstan motor is correctly mounted, and securely tighten the three screws (A). Note: � When the capstan motor has been replaced with a new one, perform recording in the EP(or LP) mode for at least 2 minutes at normal temperatures immediately be-

Motor pulley Worm gear Belt

Fig. 2-2-7a 2.2.8 Capstan motor 1. How to remove (1) Remove the belt (capstan) on the mechanism assembly back side. (2) Remove the three screws (A) and remove the capstan motor.
Screws(A) Screw(A)

fore starting the FF/REW or SEARCH operations (Aging).
Capstan motor

2.2.9 Pole base assembly (supply or take-up side) 1. How to remove (1) Remove the UV catcher 2 on the removal side by loosening the screw (A). (2) Remove the pole base assembly on the supply side from the mechanism assembly by loosening the screw (B) on the mechanism assembly back side and sliding the pole base assembly toward the UV catcher 2. (3) As for the pole base assembly on the take-up side, turn the pulley of the loading motor to lower the cassette holder because the screw (B) is hidden under the control plate. (See the �Procedures for Lowering the Cassette holder assembly� of 1.3 DISASSEMBLY/ASSEMBLY METHOD.) Further turn the motor pulley to move the cassette holder until the screw (B) is no longer under the control plate (in the half-loading position). Then remove it as done for the supply side by removing the screw (B). Note: � After reinstalling the Pole base assembly and the UV catcher2, be sure to perform compatibility adjustment.
Screw(A) UV catcher2 Screw(A)

Belt

Fig. 2-2-8a

Spacer

Spacer

UV catcher2

Connector for the capstan motor

Fig. 2-2-8b

Screw(B)

Fig. 2-2-9a 2-9

Klienci kupując ten produkt kupili także

$4.99

HRJ3008UM JVC
Instrukcja Obsługi

Kompletna instrukcja obsługi w formie pliku PDF. Plik PDF zostanie dostarczony na Twój adres email…

$4.99

HR-J3008UM JVC
Katalog Części

Katalog części w formie pliku PDF. Plik zawiera wykaz części znajdujących się w urządzeniu wr…
>
Parse Time: 0.435 - Number of Queries: 280 - Query Time: 0.18