|
|
|
Kategorie
|
|
Informacje
|
|
Polecamy
|
|
|
 |
|
|
Dla tego produktu nie napisano jeszcze recenzji!
 ;
Schematy są ale można wysilić się i zrobić kolorowy skan i o większej rozdzielczości. Wtedy schematy płytek będą czytelniejsze. Całość super jako wartość merytoryczna. Wszystkie dane potrzebne do podłączenia różnego rodzajów urządzeń takich gramofon, CD itd.
 ;
Szybko, sprawnie i tanio. Serwis godny polecenia. Będę polecał innym
;
Ogólnie jest OK, z wyjątkiem obrazu płyty głównej, który jest miejscami mało czytelny, ale można sobie poradzić.
;
Dokładna dokumentacja, pomogła w szybkiej naprawie telewizora. Dziękuję!
;
jedyne do czego mogę mieć zastrzeżenie to jakość zdjęć zawartych w przesłanej instrukcji serwisowej ponieważ są fatalnej jakości, praktycznie nieczytelne. tak poza tym jestem zadowolony to jest to czego szukałem.
1.8 Servicing the video navigation function The video navigation function built into this unit works by storing the video navigation data in the internal Flash memory and writing data in the cassette tape simultaneously. Therefore, the Flash memory and the cassette tape (self- recorded tape) form a related pair. If the Flash memory or the board assembly (in which the Flash memory is included) is replaced, the video navigation function will not operate. In this case, it is required to copy the video navigation data in the original Flash memory into the Flash memory of the unit which the navigation function is available.
(5) Press the �STOP� button of the master unit. When copying is started,�3� will be displayed on the FDP and when copying is completed the FDP display changes from �3� to �4� . When an error occurs during the copying process, �5� will be displayed on the FDP. During such an occurrence the slave unit FDP display is �1� .
FDP : 1 (S)
FDP : FDP : FDP :
3 4
<Error>
(M) (M) (M)
<Completed>
5
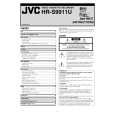
1.8.1 Copying the video navigation data Notes: � When copying the video navigation data, initialization of the Flash memory of the master unit is required. � Connect the JLIP cable to each �JLIP terminal� of the VCR. JLIP Cable (Parts No. : QAM0129-001 or PEAC0453)
Player <Slave Unit (S)> JLIP cable
(6) Press the�STOP� button of the master unit. The copy mode of the master and slave unit will be cancelled simultaneously. 1.8.2 Erasing the video navigation data (Initialization) This is the service mode to erase all the video navigation data inside the Flash memory. When a unit is replaced or after an operations check, erase the data which is not required while observing the TV screen. Notes: � During Flash memory initialization, the transmission of the Jig code may affect the peripheral VCR. Therefore, when initializing the Flash memory, be sure to unplug the peripheral VCR power cable. � Please take note that after erasing data cannot be restored, therefore care must be exercised. � When using the Jig RCU, it is required to set the VCR to the Jig RCU mode (the mode in which codes from the Jig RCU can be received).
Jig RCU [Data transmitting method] Depress the � � ( 3 ) button after the data code is set.
[CONDITION]
� Power OFF � No cassette tape
Recorder <Master Unit (M)>
[CONDITION]
� Power OFF � No cassette tape � Flash memory initialization
Fig. 1-8-1a
Connection diagram
(1) Set the VCR to the Jig RCU mode (the mode in which codes from the Jig RCU can be received). (2) Turn off the power of the 2 units (slave and master) VCR and set it without a cassette tape. (3) Press the �PLAY� button of the slave unit for 7 seconds. When the copy mode is set, �1� will be displayed on the FDP. (To cancel the copy mode, press the �PLAY� button of the slave unit.)
FDP : 1 (S)
CUSTOM CODE 43: A CODE
INITIAL MODE
DATA CODE
Fig. 1-8-2a
Jig RCU [PTU94023B]
(4) Press the �PAUSE� button of the master unit for 7 seconds. When the copy mode is set, �2� will be displayed on the FDP. (To cancel the copy mode, press the �PAUSE� button of the master unit.)
FDP : 2 (M)
1-9
|
|
|
> |
|