|
|
|
Kategorie
|
|
Informacje
|
|
Polecamy
|
|
|
 |
|
|
Dla tego produktu nie napisano jeszcze recenzji!
 ;
Wszystko w porządku.
Instrukcja czytelna i kompletna.
Dziękuję.
all right!
thank you.
;
Bardzo dobra instrukcja. Zawiera wszystko co potrzeba, polecam!
 ;
Instrukcja jest OK. Schematy czytelne, opisane niektóre procedury.
;
Instrukcja bardzo czytelna. zawiera co potrzeba. Polecam
;
...instrukcja serwisowa w pełni czytelna i kompletna. Dziękuję!
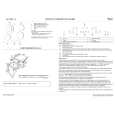
DISASSEMBLY INSTRUCTIONS
1. �REAR, CABINET� Removal
1) Remove the battery lid. (1) 2) Remove the four screws. 3) Insert tweezers or like into the gap of the battery insertion slot as shown, and remove the hook. 4) Remove the cabinet assembly in the direction of the arrow (2). Screws CABI ASSY, REAR
Screws Screws Screws 1 LID, BATT
2
Hook
Tweezers
2. �MAIN BOARD� Removal
1) Remove three screws A. 2) Remove the two screws B, and remove the headphones jack. 3) Remove soldering of the motor terminal. (1) 4) Remove soldering of the battery terminal (-) (2).
B Screws
B Screws
A Screws A Screws MAIN board
2
1
2
|
|
|
> |
|