|
Dla tego produktu nie napisano jeszcze recenzji!
 ;
Schematy są ale można wysilić się i zrobić kolorowy skan i o większej rozdzielczości. Wtedy schematy płytek będą czytelniejsze. Całość super jako wartość merytoryczna. Wszystkie dane potrzebne do podłączenia różnego rodzajów urządzeń takich gramofon, CD itd.
 ;
Szybko, sprawnie i tanio. Serwis godny polecenia. Będę polecał innym
;
Ogólnie jest OK, z wyjątkiem obrazu płyty głównej, który jest miejscami mało czytelny, ale można sobie poradzić.
;
Dokładna dokumentacja, pomogła w szybkiej naprawie telewizora. Dziękuję!
;
jedyne do czego mogę mieć zastrzeżenie to jakość zdjęć zawartych w przesłanej instrukcji serwisowej ponieważ są fatalnej jakości, praktycznie nieczytelne. tak poza tym jestem zadowolony to jest to czego szukałem.
CHAPTER 8 PAPER DECK-L1
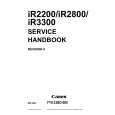
3.3.7 Routing the Lifter Cable
1) Check to make sure that the lifter drive shaft [1] and the lifter [2] are kept in place by means of a hex wrench [3] and two long screwdrivers [4]. 2) Fix the four cable fixing plates [5] in place to the lifter using two screws each. 3) Hook the lifter cable [6] on the four pulleys [7]. 4) Hook the ball of the lifter cable on the two pulleys [8] at the front/rear of the lifter drive shaft; then, wind it along the groove of the pulley about 1.5 turns. At this time, be sure to keep the lifter cable taut so that the long screwdrivers used to keep the lifter in position will move up and stop. 5) In this condition, secure the two pulleys [5] in place to the lifter drive shaft using a set screw [9] (1 each). 6) Mount the pulleys [8] to the lifter drive shaft; then, measure the distance from the base plate of the compartment to the top face of the lifter, making sure that the lifter is level.
[7] [5] [1] [7]
[8] [6] [9] [5]
[5] [9] [8] [3] [5] [2] [4]
F08-303-12
8-36 P
COPYRIGHT © 2001 CANON INC. 2000 2000 2000 2000 CANON iR2200/iR2800/iR3300 REV.0 MAR. 2001
 $4.99 IR3300 CANON
Schematy Zestaw schematów dla tego urządzenia. Plik PDF zawierający schematy będzie dostarczony na Twó…
|