|
|
|
Kategorie
|
|
Informacje
|
|
Polecamy
|
|
|
Dla tego produktu nie napisano jeszcze recenzji!
 ;
...instruction is ok.
...instrukcja jest ok.
Thanks/Dzięki
;
Documentation made available quickly and It is good quality. Thanks.
CHAPTER 3. REPAIR INSTRUCTION
4
When the message on the right appears, go to 5.
5
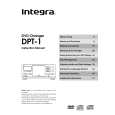
1. Place the Auto Focus Chart (2) at 135.0cm away from the front of the camera finder. * Place the Auto Focus Chart on a plain color wall or equivalent. * Adjust the light so that the brightness of the chart will be about EV8.5. 2. Adjust the position of the camera finely so that the center of the Auto Focus Chart is aligned with the center of the LCD. 3. Click the �ADJUST� button.
Auto Focus Chart (2) 135.0cm Power Source CAMERA BODY Tripod
Personal Computer
6
When the message on the right appears, click the �FINISH� button. (This ends the �Optical Unit� Adjustment.)
3-37
|
|
 |
> |
|