DX800 Ilość: 1
$4.99
» Pokaż Szczegóły
52TA5215 Ilość: 1
$4.99
» Pokaż Szczegóły
AZ2045 Ilość: 1
$4.99
» Pokaż Szczegóły
DV-310-S/TPWXZT Ilość: 1
$4.99
» Pokaż Szczegóły
PDZ86M Ilość: 1
$4.99
» Pokaż Szczegóły
AV2168TEE/C Ilość: 1
$4.99
» Pokaż Szczegóły
SR580 Ilość: 1
$4.99
» Pokaż Szczegóły
JTO500SAAS Ilość: 1
$4.99
» Pokaż Szczegóły
NV-HS825EC Ilość: 1
$4.99
» Pokaż Szczegóły
TC-37LZ85 Ilość: 1
$4.99
» Pokaż Szczegóły
ARL 846/G Ilość: 1
$4.99
» Pokaż Szczegóły
SXPR603M Ilość: 1
$4.99
» Pokaż Szczegóły
C140MU Ilość: 1
$4.99
» Pokaż Szczegóły
HQ564/16 Ilość: 1
$4.99
» Pokaż Szczegóły
ZOS3 Ilość: 1
$4.99
» Pokaż Szczegóły
DV-300-K/KUCXZT Ilość: 1
$4.99
» Pokaż Szczegóły
BCT-1610/NYXK/SP Ilość: 1
$4.99
» Pokaż Szczegóły
AT4000 Ilość: 1
$4.99
» Pokaż Szczegóły
WEGA 312 Ilość: 1
$4.99
» Pokaż Szczegóły
RBS305PDT10 Ilość: 1
$4.99
» Pokaż Szczegóły
RBS305PDT17 Ilość: 1
$4.99
» Pokaż Szczegóły
CX-NT99 Ilość: 1
$4.99
» Pokaż Szczegóły
GH4155XPQ0 Ilość: 1
$4.99
» Pokaż Szczegóły
S3VC Ilość: 1
$4.99
» Pokaż Szczegóły
E2G Ilość: 1
$4.99
» Pokaż Szczegóły
DVD795SA/98 Ilość: 1
$4.99
» Pokaż Szczegóły
LER5638AW3 Ilość: 1
$4.99
» Pokaż Szczegóły
AM-A70 Ilość: 1
$4.99
» Pokaż Szczegóły
CM8200SF Ilość: 1
$4.99
» Pokaż Szczegóły
RT12DCLWG00 Ilość: 1
$4.99
» Pokaż Szczegóły
400GTI Ilość: 1
$4.99
» Pokaż Szczegóły
B8831-4-M EU R05 Ilość: 1
$4.99
» Pokaż Szczegóły
RX8020VBK Ilość: 1
$4.99
» Pokaż Szczegóły
SYNCMASTER 400TFT Ilość: 1
$4.99
» Pokaż Szczegóły
AWZ 221/2 Ilość: 1
$4.99
» Pokaż Szczegóły
CPT08DA1A Ilość: 1
$4.99
» Pokaż Szczegóły
KRC-691 Ilość: 1
$4.99
» Pokaż Szczegóły
MASTERGARDENS Ilość: 1
$4.99
» Pokaż Szczegóły
ED2PHEXMB00 Ilość: 1
$4.99
» Pokaż Szczegóły
28DC2070 Ilość: 1
$4.99
» Pokaż Szczegóły
YGY395LXGZ1 Ilość: 1
$4.99
» Pokaż Szczegóły
EV 1287 Ilość: 1
$4.99
» Pokaż Szczegóły
KEBS208DWH7 Ilość: 1
$4.99
» Pokaż Szczegóły
DVD612S/022 Ilość: 1
$4.99
» Pokaż Szczegóły
MT 265 BL WP Ilość: 1
$4.99
» Pokaż Szczegóły
W sumie: $224.55
 
English Polski Spanish 
Szukaj instrukcji do
 

(e.g. AA-V20EG JVC, ZX-7 Sony )
PayPal 1000+ rating Secure, Encrypted Checkout.
 
Kategorie
Informacje
Polecamy
Strona główna >> WHIRLPOOL >> KEYS750JQ0 Instrukcja Obsługi
 
 45 szt. w koszyku 

WHIRLPOOL KEYS750JQ0
Instrukcja Obsługi


Tweetnij o tym produkcie a dostaniesz $1.00 rabatu!
  • Plik do pobrania
  • Format PDF
  • Kompletna instrukcja
  • Język: English
Cena: $4.99

Opis WHIRLPOOL KEYS750JQ0 Instrukcja Obsługi

Kompletna instrukcja obsługi w formie pliku PDF. Plik PDF zostanie dostarczony na Twój adres email po jego zakupieniu.

Instrukcje obsługi (czasami nazywane także podręcznikiem użytkownika) opisuja funkcje i sposób działania danego produktu.

Instrukcja jest dostępna w następujących językach: English

Plik nie jest jeszcze gotowy
Musisz najpierw dokonać zakupu.

Recenzje produktu
Dla tego produktu nie napisano jeszcze recenzji!
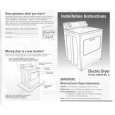
Tekstowy podgląd strony 6 (kliknij aby zobaczyć)
CHECKING YOUR VENT
Your dryer must be properly installed and vented to achieve maximum drying efficiency and shorten drying times. Use the minimum recommended installation clearances (found in your Installation Instructions) to avoid blocking the flow of combustion and ventilation air. Refer to your Installation Instructions for more information.

3. The exhaust vent can be routed up, down, left, right, or straight out the back of the dryer. Space requirements are listed in your Installation Instructions.

4. Use the straightest path possible when routing the exhaust vent. Use the fewest number of elbows and turns. Allow room when using elbows or making turns. Bend vent gradually to avoid kinking.

Fire Hazard Use a heavy metal vent. Do not use a plastic vent. Do not use a metal foil vent. Failure to follow these instructions can result in death or fire.
If the dryer is not properly installed and vented, it will not be covered under the warranty. NOTE: Service calls caused by improper venting will be paid for by the customer, whether it was a paid installation or selfinstalled. 1. Do not use plastic vent or metal foil vent. Use 4 in (10.2 cm) metal or flexible metal vent. Do not kink or crush flexible metal vent. It must be completely extended to allow adequate exhaust air to flow. Check vent after installation. Refer to your Installation Instructions for proper length requirements of vent.

5. Use duct tape to seal all joints. Do not use screws to secure vent. Lint may catch on screws.

6. Clean exhaust vent periodically, depending on use, but at least every 2 years, or when installing your dryer in a new location. s Disconnect vent from the dryer and clean one section at a time until you reach the exhaust hood.

s s s

Use the hose attachment on your vacuum, or a pole or wire with a feather duster or rag attached, to clean out lint. Be sure the flapper on the outside end of vent moves freely. When cleaning is complete, be sure to follow the Installation Instructions supplied with your dryer for final product check.

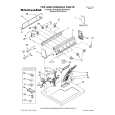
2. Use a 4 in (10.2 cm) exhaust hood. Smaller hoods increase drying times.

SURE CONNECT� Vent Kit (optional)
For easy installation of your dryer, a complete exhaust vent kit is available for purchase. The SURE CONNECT Vent Kit (No. 4396028) contains everything you need to install your dryer. You can purchase a kit by calling 1-800-442-9991, or by contacting the dealer from whom you purchased your dryer.

4" (10.2 cm) 4" (10.2 cm)

6

Klienci kupując ten produkt kupili także


Za darmo!

KEYS750JQ0 WHIRLPOOL
Instrukcja Instalacji

Kompletna instrukcja instalacji urządzenia w formie pliku PDF.Po zakupieniu tej instrukcji wyślemy…

$4.99

KEYS750JQ0 WHIRLPOOL
Katalog Części

Katalog części w formie pliku PDF. Plik zawiera wykaz części znajdujących się w urządzeniu wr…
>
Parse Time: 0.563 - Number of Queries: 267 - Query Time: 0.23