|
|
|
Kategorie
|
|
Informacje
|
|
Polecamy
|
|
|
 |
|
|
Dla tego produktu nie napisano jeszcze recenzji!
 ;
...instruction is ok.
...instrukcja jest ok.
Thanks/Dzięki
;
Documentation made available quickly and It is good quality. Thanks.
KWP-65HD1
RM-Y902
<COHP ADJUSTMENT>
1. Select �COHP� with the 1 and 4 keys on the remote control. 2. Adjust with the joystick keys on the remote control so that the slope of upper and lower horizontal lines is minimized (see below).
COHP
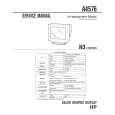
[RED REGISTRATION ADJUSTMENT]
<CENTER ADJUSTMENT>
1. Shift to Rough Adjustment mode with the 9 key on the remote control. 2. Select �GRN CENT� with the 1 key on the remote control. 3. Switch to RED by specifying that color with the key on the remote control and align with the joystick to match with the center point of the screen aligned previously in green.
RED CENT
<Final Adjustment>
1. Shift to Fine Adjustment mode with the 9 key on the remote control. 2. Use the joystick keys and straighten the vertical and horizontal lines passing through the center spot of the screen. At this time also adjust the linearity especially in the horizontal direction of the middle section.
<SKEW ADJUSTMENT>
1. Select �RED SKEW� with the 1 key on the remote control while set in Rough Adjustment mode. Adjust the slope of the vertical and horizontal lines with the joystick key.
<LINEARITY ADJUSTMENT>
(Effective Adjustment Method)
� This method allows moving to the target position by using the joystick key on the remote control. Shift as needed by pressing once at a time on the joystick key and use the adjust toggle to change the joystick key mode. Check if the mode has changed by viewing the marker color. (Note that this cannot be checked with only 1 color on the screen.) � The marker color changes from white to green (red) each time the joystick is pressed. Set to white (color) when shifting the marker. 3. Adjust the screen marker from the center to above the vortex with the 1 key on the remote control. At this point be careful not to change the vertical and horizontal lines that were aligned in the previous adjustment. (Use the joystick key mentioned above for the point you want to align.)
1. In rough adjustment mode, select �RED SIZE� and �RED LIN� with the 1 and 4 keys on the remote control and adjusting while alternately tracking each. � H-LIN Establish points at both ends of the screen as shown below. Adjust these 2 points and the center point with the joystick key so that they match with green point. (In this case, adjust by using the horizontal line in the center.)
RED LIN
Using the green line is recommended for a crosshatch pattern.
* Usually, the middle section deviates when both ends are aligned but when the peripheries of both ends are aligned, an extra margin of movement is obtained making for an effective adjustment. � V-LIN Select �RED SIZE� and adjust using the joystick keys. * V-LIN is adjusted only with �SIZE�.
� 61 �
|
|
|
> |
|