|
|
|
Kategorie
|
|
Informacje
|
|
Polecamy
|
|
|
 |
|
|
Dla tego produktu nie napisano jeszcze recenzji!
 ;
Dokładna dokumentacja, pomogła w szybkiej naprawie telewizora. Dziękuję!
 ;
jedyne do czego mogę mieć zastrzeżenie to jakość zdjęć zawartych w przesłanej instrukcji serwisowej ponieważ są fatalnej jakości, praktycznie nieczytelne. tak poza tym jestem zadowolony to jest to czego szukałem.
;
Wszystko w porządku.
Instrukcja czytelna i kompletna.
Dziękuję.
all right!
thank you.
;
Bardzo dobra instrukcja. Zawiera wszystko co potrzeba, polecam!
;
Instrukcja jest OK. Schematy czytelne, opisane niektóre procedury.
Preparation
If control fails to operate Liquid Crystal Television functions, replace batteries in the remote
Removing stand Inserting the batteries 1 Open batter y cover . 2 Inser t two �AAA� size batteries 3 Close the battery cover. CAUTION
(supplied with the pr oduct). � Do not remove stand from the Display unless using an optional wall bracket to mount it.
Befor e detaching (or attaching) stand, unplug cor d from the AC input ter minal. control unit.
Before attaching/detaching stand
� Befor perfor ming work make sur e to tur n of f the TV . � Befor e perfor ming work spr ead cushioning over base ar ea to lay the Display on. This will pr event it fr om
being damaged.
1 2
� Place the batteries with their ter minals corr esponding to the and ( ) indications in the battery compartment.
CAUTION
in place. (Hold stand so it will not dr op fr om the edge of � Remove soon as they are worn out. Chemicals that leak from batteries can cause a rash. If you the base ar ea.) find any chemical leakage, wipe thoroughly with a cloth. � The batteries supplied with this product may have a shorter life expectancy due to storage conditions. � If you will not be using the remote control unit for an extended period of time, remove batteries from it.
Improper use of batteries can result in chemical leakage or explosion. Be sure to follow the instructions below. � Place batteries with their terminals corresponding to the and ( ) indications. � Do not mix types. Different types of batteries have different characteristics. � Do not mix batteries. Mixing old and can shorten the life of new batteries or cause chemical leakage in old batteries. Unfasten four scr ews used to secur e Detach stand fr om the Display .
CAUTION
11
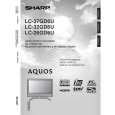
Using the remote control unit � To attach stand, per for m the above steps in r everse or der.
Use unit by pointing it towards the remote control sensor on Display. Objects between unit and the remote control Setting Display on the wall sensor may prevent proper operation. � Do not expose the remote control unit to shock. � Do not install or place the remote control unit under direct sunlight. mount Display to wall. The AN-37AGZ is compatible with the LC-37GD6U and LC-32GD6U only . � The unit may not work properly if the remote control sensor on angle of lighting Display, or operate the remote control unit AN-37AG2 wall mount bracket. (See the bracket instructions LC-37GD6U/LC-32GD6U
Angle of Display With Speakers Removed Attached LC-37GD6U 10� 5� LC-32GD6U 20� 10�
� Do not r emove stand and speaker fr om the Display unless using an optional bracket to mount it.
NOTE
CAUTION
� Installing the Liquid Crystal Television requires special skill that should only be performed by qualified service
personnel. Customers should not attempt to do the work themselves. SHARP bears no responsibility for improper Cautions regarding remote control unit mounting that results in accident or injury.
Using an optional bracket mount Display In addition, expose the remote control unit to liquids, and do not place in an area with high humidity. � You can ask a qualified service personnel about using an optional AN-37AG2 or AN-LCGWF bracket to
� Carefully r ead instructions that come with the bracket befor e beginning work. The heat may cause deformation of the remote control unit.
Hanging on wall About setting angle the Display is under direct sunlight or strong lighting. In such cases, change
for details.) closer to the remote control sensor.
LC-32GD6U LC-37GD6U
Vertical Angular mounting
|
|
|
> |
|