HB202CF Ilość: 1
$4.99
» Pokaż Szczegóły
KSC9903 Ilość: 1
$4.99
» Pokaż Szczegóły
AWZ 8670 Ilość: 1
$4.99
» Pokaż Szczegóły
1500BEOMASTER Ilość: 1
$4.99
» Pokaż Szczegóły
EV 9547 Ilość: 1
$4.99
» Pokaż Szczegóły
6AKZ486/NB Ilość: 1
$4.99
» Pokaż Szczegóły
DXR750H Ilość: 1
$4.99
» Pokaż Szczegóły
WAK 7575-D Ilość: 1
$4.99
» Pokaż Szczegóły
TRA 61260 Ilość: 1
$4.99
» Pokaż Szczegóły
Indiana A Ilość: 1
$4.99
» Pokaż Szczegóły
RCS2012RS03 Ilość: 1
$4.99
» Pokaż Szczegóły
FM10 Ilość: 1
$4.99
» Pokaż Szczegóły
AKT 607/IX Ilość: 1
$4.99
» Pokaż Szczegóły
6GD25DCXHS06 Ilość: 1
$4.99
» Pokaż Szczegóły
CSD-TD52U Ilość: 1
$4.99
» Pokaż Szczegóły
21PT6818/01 Ilość: 1
$4.99
» Pokaż Szczegóły
LTH57700DK Ilość: 1
$4.99
» Pokaż Szczegóły
WAE 8773-F Ilość: 1
$4.99
» Pokaż Szczegóły
55436 Ilość: 1
$4.99
» Pokaż Szczegóły
AMW 527 IX Ilość: 1
$4.99
» Pokaż Szczegóły
VSX-D510/KUXJI Ilość: 1
$4.99
» Pokaż Szczegóły
AWE 6111 Ilość: 1
$4.99
» Pokaż Szczegóły
ED25TWXDW03 Ilość: 1
$4.99
» Pokaż Szczegóły
SHGS71 Ilość: 1
$4.99
» Pokaż Szczegóły
KDRP407HSS0 Ilość: 1
$4.99
» Pokaż Szczegóły
DU8300XX1 Ilość: 1
$4.99
» Pokaż Szczegóły
Excellence 7781 Ilość: 1
$4.99
» Pokaż Szczegóły
C-8 Ilość: 1
$4.99
» Pokaż Szczegóły
GS5SHGXLS01 Ilość: 1
$4.99
» Pokaż Szczegóły
V747F Ilość: 1
$4.99
» Pokaż Szczegóły
SHDJ1200 Ilość: 1
$4.99
» Pokaż Szczegóły
832S BRUNS Ilość: 1
$4.99
» Pokaż Szczegóły
ACV072XH0 Ilość: 1
$4.99
» Pokaż Szczegóły
RP-111E(S) Ilość: 1
$4.99
» Pokaż Szczegóły
GSXK 5010 Ilość: 1
$4.99
» Pokaż Szczegóły
GZ50M Ilość: 1
$4.99
» Pokaż Szczegóły
PDP-S56-LR Ilość: 1
$4.99
» Pokaż Szczegóły
AWH 650 Ilość: 1
$4.99
» Pokaż Szczegóły
KECC501BBL2 Ilość: 1
$4.99
» Pokaż Szczegóły
GS465LELS2 Ilość: 1
$4.99
» Pokaż Szczegóły
VIDP100 Ilość: 1
$4.99
» Pokaż Szczegóły
XLM416BK Ilość: 1
$4.99
» Pokaż Szczegóły
CD10 Ilość: 1
$4.99
» Pokaż Szczegóły
LG5801XSW2 Ilość: 1
$4.99
» Pokaż Szczegóły
GSI 5630 W-BR Ilość: 1
$4.99
» Pokaż Szczegóły
AKP 461/IX Ilość: 1
$4.99
» Pokaż Szczegóły
RL654XV Ilość: 1
$4.99
» Pokaż Szczegóły
KTRS19KJWH00 Ilość: 1
$4.99
» Pokaż Szczegóły
CCE670W Ilość: 1
$4.99
» Pokaż Szczegóły
171.782/6 Ilość: 1
$4.99
» Pokaż Szczegóły
GSFH 5988 WS Ilość: 1
$4.99
» Pokaż Szczegóły
KWI17 Ilość: 1
$4.99
» Pokaż Szczegóły
AKP 235 NB Ilość: 1
$4.99
» Pokaż Szczegóły
50GX49B Ilość: 1
$4.99
» Pokaż Szczegóły
MT 743 AV Ilość: 1
$4.99
» Pokaż Szczegóły
CE8140-1-WEURO Ilość: 1
$4.99
» Pokaż Szczegóły
FW330/21 Ilość: 1
$4.99
» Pokaż Szczegóły
ART 725 Ilość: 1
$4.99
» Pokaż Szczegóły
KEBS208DBS10 Ilość: 1
$4.99
» Pokaż Szczegóły
RZ Ilość: 1
$4.99
» Pokaż Szczegóły
W sumie: $299.40
 
English Polski Spanish 
Szukaj instrukcji do
 

(e.g. AA-V20EG JVC, ZX-7 Sony )
PayPal 1000+ rating Secure, Encrypted Checkout.
 
Kategorie
Informacje
Polecamy
Strona główna >> WHIRLPOOL >> LER5600JT0 Instrukcja Obsługi
 
 60 szt. w koszyku 

WHIRLPOOL LER5600JT0
Instrukcja Obsługi


Tweetnij o tym produkcie a dostaniesz $1.00 rabatu!
  • Plik do pobrania
  • Format PDF
  • Kompletna instrukcja
  • Język: English
Cena: $4.99

Opis WHIRLPOOL LER5600JT0 Instrukcja Obsługi

Kompletna instrukcja obsługi w formie pliku PDF. Plik PDF zostanie dostarczony na Twój adres email po jego zakupieniu.

Instrukcje obsługi (czasami nazywane także podręcznikiem użytkownika) opisuja funkcje i sposób działania danego produktu.

Instrukcja jest dostępna w następujących językach: English

Plik nie jest jeszcze gotowy
Musisz najpierw dokonać zakupu.

Recenzje produktu
Dla tego produktu nie napisano jeszcze recenzji!

Tekstowy podgląd strony 10 (kliknij aby zobaczyć)
Drying Rack
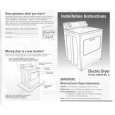
The drying rack is useful for machine drying items you would not necessarily want to tumble dry or that you would normally line dry (for example, tennis shoes, pillows, stuffed toys). If your model does not have a drying rack, you may purchase one. For ordering information, please refer to the �Assistance or Service� page of this manual. You may also contact the dealer from whom you purchased your dryer. To use the drying rack 1. Slide rear pegs into the dimples on the back wall of the dryer. Lower the front legs to rest on the dryer opening.
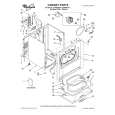
DRYER CARE
Cleaning the Lint Screen
Every load cleaning
The lint screen is located on the top of the dryer. Clean it before each load. A screen blocked by lint can increase drying time. To clean 1. Pull the lint screen towards you. Roll lint off the screen with your fingers. Do not rinse or wash screen to remove lint. Wet lint is hard to remove.

2. Put the wet items on top of the rack. Leave space between the items so air can reach all the surfaces. Close the door. NOTE: Do not allow items to hang over the edge of the rack. 3. Select a timed drying cycle and temperature, or an air cycle. Items containing foam, rubber, or plastic must be dried on a clothesline or by using an air cycle. 4. Push the START button. NOTE: The rack must be removed for normal tumbling. Do not use the automatic cycle with the drying rack. This chart shows examples of items that can be rack-dried and the suggested cycle, temperature setting, and drying time. Actual drying time will depend on the amount of moisture items hold. Rack Dry Wool Sweaters Block to shape and lay flat on the rack Stuffed toys or pillows Cotton or polyester fiber filled Stuffed toys or pillows Foam rubber filled Sneakers or canvas shoes Cycle Timed Temp Low Time* 60

2. Push the lint screen firmly back into place. IMPORTANT: s Do not run the dryer with the lint screen loose, damaged, blocked, or missing. Doing so can cause overheating and damage to both the dryer and fabrics.
s

Some towels made of synthetic fibers and natural fibers (polyester and cotton blends) may shed more lint than other towels, causing your dryer�s lint screen to fill up faster. Be sure to remove lint from the lint screen before and after drying new towels. If lint falls off the screen into the dryer during removal, check the exhaust hood and remove the lint. See �Checking Your Vent.�

s

As needed cleaning
Timed Low 60 Laundry detergent and fabric softener residue can build up on the lint screen. This buildup can cause longer drying times for your clothes, or cause the dryer to stop before your load is completely dry. The screen is probably clogged if lint falls off the screen. Clean the lint screen with a nylon brush every six months or more frequently if it becomes clogged due to a residue buildup.

Air (no heat) Air (no heat)

None

90

To wash
None 90 1. Wet both sides of lint screen with hot water. 2. Wet a nylon brush with hot water and liquid detergent. Scrub lint screen with the brush to remove residue buildup.

*(Minutes). Reset cycle to complete drying, if needed.

3. Rinse screen with hot water. 4. Thoroughly dry lint screen with a clean towel. Replace screen in dryer.

10

Klienci kupując ten produkt kupili także


Za darmo!

LER5600JT0 WHIRLPOOL
Instrukcja Instalacji

Kompletna instrukcja instalacji urządzenia w formie pliku PDF.Po zakupieniu tej instrukcji wyślemy…

$4.99

LER5600JT0 WHIRLPOOL
Katalog Części

Katalog części w formie pliku PDF. Plik zawiera wykaz części znajdujących się w urządzeniu wr…
>
Parse Time: 0.315 - Number of Queries: 321 - Query Time: 0.121