|
Dla tego produktu nie napisano jeszcze recenzji!
 ;
...instruction is ok.
...instrukcja jest ok.
Thanks/Dzięki
;
Documentation made available quickly and It is good quality. Thanks.
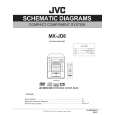
3.1.5 Removing the rear panel (See Figs.8 to 11) � Prior to performing the following procedures, remove the metal cover. (1) From the back side of the main body, remove the screw J attaching the rear cover. (See Fig.10.) (2) Release the sections c and remove the rear cover from the rear panel. (See Fig.10.) (3) Remove the two screws K and eighteen screws L attaching the rear panel. (See Fig.11.) (4) Remove the screw L� attaching the rear panel.(See Fig.11.) [US/UX/UN version only] Reference: Remove the tuner and video board as required. (See Figs.8 and 9.) (5) From the both sides of the main body, release the sections d of the center chassis in the direction of the arrow and release the joints e attaching the rear panel to the bottom chassis. (See Fig. 11.)
J
c Rear cover Fig.10 Rear panel Rear panel
L
d
L'
L
L
e
K
L
Fig.11
Bottom chassis
e
(No.MB282)1-11
 $4.99 MX-JD8 JVC
Schematy Zestaw schematów dla tego urządzenia. Plik PDF zawierający schematy będzie dostarczony na Twó…
|