|
Dla tego produktu nie napisano jeszcze recenzji!
 ;
Dokładna dokumentacja, pomogła w szybkiej naprawie telewizora. Dziękuję!
 ;
jedyne do czego mogę mieć zastrzeżenie to jakość zdjęć zawartych w przesłanej instrukcji serwisowej ponieważ są fatalnej jakości, praktycznie nieczytelne. tak poza tym jestem zadowolony to jest to czego szukałem.
;
Wszystko w porządku.
Instrukcja czytelna i kompletna.
Dziękuję.
all right!
thank you.
;
Bardzo dobra instrukcja. Zawiera wszystko co potrzeba, polecam!
;
Instrukcja jest OK. Schematy czytelne, opisane niektóre procedury.
NX-HD10
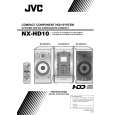
Removing the Mechanism P.C. Board (Refer to Fig 10.)
Reference:The mechanism P.C. board can be removed without removal of the TRAMECHA assembly.
C
Flexible wire
Shorting round
Note: Before disconnecting the flexible wire coming from the pickup from the connector, be sure to solder its shorting round. If the flexible wire is connected without soldering, it may cause breakdown of the pickup. 1. Solder the shorting round of the flexible wire connected with the mechanism P.C. board from the back of the mechanism assembly. 2. Disconnect the flexible wire from the connector CN601 on the mechanism P.C. board. 3. Remove the three screws C fastening the mechanism P.C. board. 4. Unsolder the two points of the part h and one point of the part i of the mechanism P.C. board. Then, remove the mechanism P.C. board upwards. Note: When reinstalling the mechanism P.C. board, connect the flexible wire coming from the pickup to the connector first and then remove the solder from the shorting round of the flexible cable.
Soldered part h
CN601 on mechanism P.C. board
C
C
Soldered part i
Fig. 10
1-17
|