|
|
|
Kategorie
|
|
Informacje
|
|
Polecamy
|
|
|
 |
|
|
Dla tego produktu nie napisano jeszcze recenzji!
 ;
Wszystko w porządku.
Instrukcja czytelna i kompletna.
Dziękuję.
all right!
thank you.
;
Bardzo dobra instrukcja. Zawiera wszystko co potrzeba, polecam!
 ;
Instrukcja jest OK. Schematy czytelne, opisane niektóre procedury.
;
Instrukcja bardzo czytelna. zawiera co potrzeba. Polecam
;
...instrukcja serwisowa w pełni czytelna i kompletna. Dziękuję!
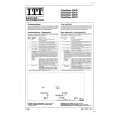
3.3.21 Control Board
.
When exchanging the control board, remove the EEPROM off the existing board and install it on the new one. The control board is different for each model. OL400e and OL4OOex: OLCW-PCB OL4lOex: OLCW-3 PC9 Remove the upper cover (see 3.3.1).
.
(1)
(2) Remove the lower base unit (see 3.3.8).
(3)
Remove two screws 0.
(4) Move the control board Q in the direction of the arrow to disconnect it from the power supply board Q. (5) Remove the control board 8 together with the PC9 guide plate @ (remove the fan motor Q at the same time). (6) Remove three screws 8 and two posts 0, and remove the PCB guide plate @ from the control board @. (7) Disconnect the connector from CNl of the control board 8, and remove the fan motor Bt. Note: Install the EEPROM @I on the new control board.
3-27
|
|
|
> |
|