|
|
|
Kategorie
|
|
Informacje
|
|
Polecamy
|
|
|
 |
|
|
Dla tego produktu nie napisano jeszcze recenzji!
 ;
Dobrej jakości skan - wkońcu mogłem poznać wszystkie funkcje tego odtwarzacza - polecam .
;
Gruba instrukcja - poprostu wszystko co potrzreba - polecam .
Important
Safety Instructions
To reduce the risk of fire, electrical shock, or iujury when using your refrigerator-freezer, follow basic precautions including the following:
1. Read all operating instructions before using your refrigeratorfreezer. 2. Child entrapment and suffocations are not problems of the past. Junked or abandoned refrigerators are still dangerous ... even if they will �just sit in the garage for a few days.�
If you are getting rid of your old refrigerator, do it safely. Please read the enclosed safety booklet from the Association of Home Appliance Manufacturers. Help prevent accidents. 3. Never allow children to operate, play with, or crawl inside the refrigerator.
. SAVE THESE INSTRUCTIONS .
4. Never clean refrigerator parts with flammable fluids. The fumes can create a fire hazard or explosion. . FOR YOUR SAFETY.
DO NOT STORK OR USE GASOLINE OR OTHER FLAMMARLEVAPORS AND LIQUIDS IN THE VICINITY OF THIS OR ANY OTHER APPLIANCE. THE FUMES CAN CREATE A FIRE HAZARD OR EXPLOSION.
Before Using Your Refrigerator
A. Remove labels
Remove the tape and any inside labels before using the refrigerator. To remove any remaining glue: Rub briskly with thumb to make a n ball, then remove. OR . Soak area with liquid hand dishwashing detergent before removing glue as described above. Do not use sharp instruments, rubbing alcohol, flammable fluids or abrasive cleaners. These can damage the material. See �Important Safety Instructions� above. NOTE: Do not remove the Tech Sheet located on the bottom of the refrigerator.
D. Install properly
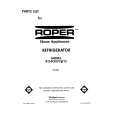
Install the refrigerator according to the dimensions shown below. Leave extra space along the hinge-side wall to allow the door to be opened wider. Do not install the refrigerator: . next to an oven, radiator or other heat source; mout in the weather or direct sunlight; n in an area where the room temperature will fall below 55°F
(13OC). 3 in. (7.5 cm) min. between overhead
cabinets and top of refrigerator. \ Al
E. Level refrigerator-freezer
Follow the leveling instructions for your refrigerator model. Make sure the refrigerator is level for efficient operation.
Models RTl4DK, RT14DM, RTl4CK and RTlGDK (RT14DK and RT14DM do not have rollers.)
B. Clean it
Clean your refrigerator before using it. See cleaning instructions on page 9.
C. Plug it in
Recommended Grounding Method
A 115 Volt, 60 Hz., AC only 15 or 20 ampere fused and properly grounded electrical supply is required. It is recommended that a separate circuit serving only this appliance be provided. Use a receptacle which cannot be turned off with a switch or pull chain. Do not use an extension cord. SeeElectrical Requirements and Grounding Instruction Sheet in literature package for complete details.
1.Two threaded leveling legs are secured into the base of the refrigerator. Remove the legs and insert them into the holes at the bottom front comers of the refrigerator. Carefully roll or slide
the refrigerator into place.
zII3m II
II
�rn[. \
l/2 in. (1.25 cm) on each side of the retigerator for easier installation. 1 in. (2.5 cm) min. between rekigerator condenser coils and the wall. (Models RT2OCK and RT2OAK can be flush against back wall.)
/
completely off the floor. 3. Adjust each leg so that refrigerator does not rock. 4. Place a level on top of the refrigerator-first side to side, then front to back. Turn leg clockwise to raise the front of the refrigerator. Turn leg counterclockwise to lower the front of the refrigerator. 5. Check the levelness again and repeat step 4 until the refrigerator is level.
2. Turn legs to the left until rollers are
Page 2
|
|
|
> |
|