|
|
|
Kategorie
|
|
Informacje
|
|
Polecamy
|
|
|
 |
|
|
Dla tego produktu nie napisano jeszcze recenzji!
Connecting the Speakers
Turn off the Power first and set the volume knob to low initially before connecting.
Right front speaker Left front speaker Center speaker
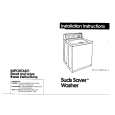
Connecting the FM and AM(MW) Antennas
1 2 3
If AM reception is poor, connect an outdoor AM antenna(not supplied).
� Connect the speakers using the supplied speaker
cords by matching the colors of the terminals and those of the cords.
� To obtain the best possible surround sound, adjust
the speaker parameters (distance, level, etc.).
AM Loop Antenna (supplied)
CONNECTIONS
Y
ANTENNA
If FM reception is poor, connect an outdoor FM antenna (not supplied). FM Antenna (supplied) Snap the tabs on the loop into the slots of the base to assemble the AM loop antenna.
Rear speaker Rear speaker (Left Surround) (Right Surround) Subwoofer
Y
Note
� Be sure to match the speaker cord to the appropriate terminal on the components: + to + and � �
� to �. If the cords are reversed, the sound will be distorted and will lack bass. If you use front speakers with low maximum input rating, adjust the volume carefully to avoid excessive output on the speakers. Do not disassemble the front cover of supplied speaker.
Cooling fan (See �About Cooling Fan� below.)
FM antenna connection
1. Connect the FM antenna supplied to the FM 75� COAXIAL terminal as temporary measure. 2. Slowly move the antenna wire around until you find a location where reception is good, then fasten it to a wall or other rigid surface.
� If reception is poor, connect an outdoor antenna. Before attaching a 75� coaxial cable (with a standard type connector), disconnect the supplied FM antenna. (About the cooling fan)
A cooling fan is mounted on the rear panel of the center unit to prevent abnormal temperature inside the center unit, thus assuring normal operation. The cooling fan automatically starts rotating to supply external cool air to the inside of the center unit when the internal temperature exceeds the specified limit.
AM(MW) antenna connection
1. Connect the AM loop antenna supplied to the AM and terminals. 2. If reception is poor, connect an outdoor single vinyl-covered wire to the AM terminal. (Keep the AM loop antenna connected).
Ideal Speaker Placement
Front Speakers
Set the front speakers so that their tweeters (high-range) are aligned at about ear level and at a horizontal angle of 45° to the prime listening position.
Rear Speakers
Set the rear speakers further back, parallel to the walls, at 60 to 90 centimeters (2 to 3 feet) above prime listening position ear level. If the space behind the listening position is insufficient (i.e., too close to the wall), place the rear speakers facing each other on either side.
Center Speaker
Ideally the center speaker should be positioned with its top surface flush with the front speakers. However, you may place the speaker either on top or near the bottom of your TV set.
For safety, observe the following carefully. � Make sure there is good ventilation around the center unit. Poor ventilation could overheat and cause damage. � DO NOT block the cooling fan and the ventilation openings or holes. (If they are blocked by a newspaper or cloth, etc., the heat may not be able to escape.)
Subwoofer Speaker
Place the subwoofer at any convenient location within the vicinity of the listening position.
9
10
|
|
|
> |
|