|
|
|
Kategorie
|
|
Informacje
|
|
Polecamy
|
|
|
 |
|
|
Dla tego produktu nie napisano jeszcze recenzji!
 ;
Schematy są ale można wysilić się i zrobić kolorowy skan i o większej rozdzielczości. Wtedy schematy płytek będą czytelniejsze. Całość super jako wartość merytoryczna. Wszystkie dane potrzebne do podłączenia różnego rodzajów urządzeń takich gramofon, CD itd.
 ;
Szybko, sprawnie i tanio. Serwis godny polecenia. Będę polecał innym
;
Ogólnie jest OK, z wyjątkiem obrazu płyty głównej, który jest miejscami mało czytelny, ale można sobie poradzić.
;
Dokładna dokumentacja, pomogła w szybkiej naprawie telewizora. Dziękuję!
;
jedyne do czego mogę mieć zastrzeżenie to jakość zdjęć zawartych w przesłanej instrukcji serwisowej ponieważ są fatalnej jakości, praktycznie nieczytelne. tak poza tym jestem zadowolony to jest to czego szukałem.
Editing
Watching the camcorder picture without connecting cables � LASER LINK (continued)
Editing methods
This section introduces you to various ways to edit tape recordings.
3
Start camcorder playback using LASER LINK. The VCR input automatically switches to �L3� and the camcorder picture appears on the TV screen. Refer to the operating instructions of the camcorder for camcorder operations using LASER LINK. Adjust the distance and angle between the camcorder and the VCR so that the playback picture appears clearly on the TV.
Basic editing
You can make a copy of a tape.
Source tape
Normal audio Video and hi-fi audio
4
To stop watching the camcorder picture Move the camcorder so that its LASER LINK IR emitter no longer points at the LASER LINK IR receiver of this VCR. The video channel or input returns to the position selected before using LASER LINK.
Tips � Cable connection is recommended when recording or editing the picture from the camcorder (page 38). � If you do not want to automatically switch the video input and display the picture on the TV when the camcorder is aimed at the IR receiver of the VCR, set AUTO LASER LINK to OFF in the ADVANCED OPTIONS menu. In this case, you can view the picture by pressing the INPUT SELECT button to switch the input to �L3� (see page 33). Notes � Do not cover the IR emitter of the camcorder or the IR receiver of the VCR with your hands or other objects. � Infrared rays cannot pass through walls or opaque glass. Be sure to place the VCR in an unobstructed position. Using LASER LINK through glass will shorten the transmission range. � Do not place the camcorder too close to the VCR, as this may cause noise and/or beat. � When connecting the VCR to the TV using only the antenna cable, press the TV/VIDEO button to display the VIDEO indicator in the VCR�s display window before starting to use LASER LINK. � The IFT-AV1 Cordless AV Transmitter System uses a different frequency band, so it cannot be used with this VCR.
Edited tape
Insert editing
You can replace an existing scene with material from another recording. There are three kinds of insert editing. Video insert Replaces the original video and hi-fi audio. The monaural sound on the normal audio track is retained. Audio insert Replaces the original monaural sound on the normal audio track. The video and hi-fi sound are left intact. For example, you can use this feature to add commentary to a tape recorded on a camcorder. A/V insert Replaces the original video and both hifi and monaural sound.
Video insert Source tape
Normal audio Video and hi-fi audio
Edited tape
Audio insert Source tape
Normal audio Video and hi-fi audio
Edited tape
36
Additional Operations
Editing
37
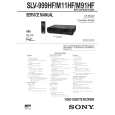
Hooking up to a VCR or stereo system
How to hook up to record on this VCR
This VCR (Recorder) TV
Basic editing
(when recording on this VCR)
Before you start editing � Turn on your TV and set it to the video channel. � Press INPUT SELECT to display �L2� (or �L1�) in the display window. � Press SP/EP to select the tape speed, SP or EP.
X PAUSE
z REC
LINE-2 IN Other VCR (Player) LINE OUT
� On this VCR, press EDIT to display �EDIT� in the display window. If the other VCR has a similar button, press it to activate edit function.
1 2 3 4
Insert a source tape with its safety tab removed into the other (playback) VCR. Search for the point to start playback and set it to playback pause. Insert a tape into this (recording) VCR. Search for the point to start recording and press X PAUSE. Press z REC on this VCR and set it to recording pause. To start editing, press the X PAUSE buttons on both VCRs at the same time.
: Signal flow
VMC-810HG audio/video cable (not supplied)
How to hook up to a stereo system
Connect LINE-2 IN AUDIO on this VCR to the audio output jacks on the stereo system, using the RK-C510KS audio cable (not supplied). If the other VCR has a CONTROL S OUT jack for synchronized editing Hook up to record on the other VCR, then connect the VCRs via the CONTROL S jacks. The CONTROL S connection lets you control (pause and release pause) both VCRs from the recording VCR.
Notes � Make sure you connect the plugs to jacks of the same color. � If the other VCR is a monaural type and connected to this VCR�s LINE-2 IN jacks, connect the audio plug to the AUDIO L (white) jack. The sound is recorded on both right and left channels. When connecting to the AUDIO R (red) jack, the sound is recorded only on the right channel. � If you connected this VCR to both the LINE IN and LINE OUT jacks of the other VCR, select the input correctly to prevent a humming noise. � You can also use the LINE-1 IN jacks for editing. If the other VCR is a monaural type, the sound is recorded only on the channel whose jack is connected to the audio plug. To record on both right and left channels, connect the audio plugs to the AUDIO R/L jacks using a VMC-910HG audio/video cable (not supplied). � If the CONTROL S IN jack is used for S-Link� (A/V bus control) with a TV, the CONTROL S connection cannot be used for editing.
To stop editing Press the x STOP buttons on both VCRs.
Tip � To cut out unwanted scenes while editing, press X PAUSE on this VCR when an unwanted scene begins. When it ends, press X PAUSE again to resume recording. Note � If you start recording following the procedure above, the VCR won�t start recording with the APC function. To record a tape with the APC function, press z REC again during recording pause in step 3 so that the VCR analyzes the tape. Then when you start recording in step 4, press X PAUSE immediately after the APC indicator stops flashing. If you press X PAUSE before the APC indicator stops flashing, the APC function is canceled.
38 Editing
Editing
39
1-9
|
|
|
> |
|