|
|
|
Kategorie
|
|
Informacje
|
|
Polecamy
|
|
|
 |
|
|
Dla tego produktu nie napisano jeszcze recenzji!
 ;
Dobrej jakości skan - wkońcu mogłem poznać wszystkie funkcje tego odtwarzacza - polecam .
;
Gruba instrukcja - poprostu wszystko co potrzreba - polecam .
Preheat temperatures are affected by varying factors such as room temperature and peak energy usage times. It is normal for the temperature showing on the display and the actual oven temperature to differ. Waiting an additional 10 minutes after the preheat conditioning time ends to put food in the oven is suggested when baking foods with leavening ingredients, such as yeast, baking powder, baking soda and eggs.
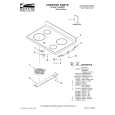
BROILING CHART
For best results, place food 3" (7 cm) or more from the broil element. Times are guidelines only and may need to be adjusted for individual foods and tastes. Recommended rack positions are numbered from the bottom (1) to the top (5). For diagram, see the �Positioning Racks and Bakeware� section. RACK POSITION COOK TIME (in minutes) Side 1 Side 2
Broiling and Custom Broiling
Broiling uses direct radiant heat to cook food. Changing the temperature when Custom Broiling allows more precise control when cooking. The lower the temperature, the slower the cooking. Thicker cuts and unevenly shaped pieces of meat, fish and poultry may cook better at lower broiling temperatures. s For best results, use a broiler pan and grid. They are designed to drain juices and help avoid spatter and smoke. If you would like to purchase a broiler pan, one may be ordered. See �Assistance or Service� section to order. Ask for Part Number 4396923.
s
FOOD Steak 1" (2.5 cm) thick medium rare medium well-done Ground meat patties* ³ �" (2 cm) thick well-done Pork chops 1" (2.5 cm) thick Ham slice, precooked ¹ �" (1.25 cm) thick Frankfurters Lamb chops 1" (2.5 cm) thick Chicken bone-in pieces boneless breasts Fish Fillets ¹ �-¹ �" (0.6-1.25 cm) thick Fish Steaks 1" (2.5 cm) thick
4 4 4
14-15 15-16 18-19
7-8 8-9 9-10
4
13-14
7-8
For proper draining, do not cover the grid with foil. The bottom of the pan may be lined with aluminum foil for easier cleaning. Trim excess fat to reduce spattering. Slit the remaining fat on the edges to avoid curling. Pull out oven rack to stop position before turning or removing food. Use tongs to turn food to avoid the loss of juices. Very thin cuts of fish, poultry or meat may not need to be turned. After broiling, remove the pan from the oven when removing the food. Drippings will bake on the pan if left in the heated oven, making cleaning more difficult.
4 4 4 4
20-22 8-10 5-7 14-17
10-11 4-5 3-4 8-9
s
s
s
Before broiling, position rack according to the Broiling Chart. It is not necessary to preheat the oven before putting food in unless recommended in the recipe. Position food on grid in the broiler pan, then place it in the center of the oven rack. Close the door to the broil stop position to ensure proper broiling temperature.
3 4 4 4
17-20 11-16 8-10 16-18
17-20 11-16 4-5 8-9
*Place up to 9 patties, equally spaced, on broiler grid.
Timed Cooking
To Broil:
1. Press CUSTOM BROIL. The broil oven indicator light will light up. 2. Press START/ENTER. The On and Heat oven indicator lights will light up. The temperature setting can be changed any time before or after pressing START/ENTER. See �Custom Broiling� section. If broiling while the time is counting down, the set broiling temperature can be seen for 5 seconds by pressing CUSTOM BROIL. 3. Press OFF/CANCEL when finished.
WARNING
Food Poisoning Hazard Do not let food sit in oven more than one hour before or after cooking. Doing so can result in food poisoning or sickness.
Timed Cooking allows the oven to be set to cook in 2 different ways. The oven can be set to start cooking immediately and shut off automatically at the end of the cooking time. Or, the oven can be set to start at a later time, cook for a specified length of time and shut off automatically at the end of the cooking time. Foods that require a preheated oven should not be cooked using a delayed function.
Custom Broiling
If foods are cooking too fast, press the TEMP/TIME �up� or �down� arrow pad until 325°F (163°C) shows on the display. 1. Press CUSTOM BROIL to broil foods slower from the start of cooking. 2. Press the TEMP/TIME �up� or �down� arrow pad to enter a temperature between 300°F and 500°F (149°C and 260°C). 3. Press START/ENTER. 4. Press OFF/CANCEL when finished.
To Set a Cook Time:
1. Press BAKE. The bake oven indicator light will light up. 2. Set the temperature (optional). Press the TEMP/TIME �up� or �down� arrow pads to enter a temperature other than the one displayed.
13
|
|
|
> |
|