|
Dla tego produktu nie napisano jeszcze recenzji!
 ;
Wszystko w porządku.
Instrukcja czytelna i kompletna.
Dziękuję.
all right!
thank you.
;
Bardzo dobra instrukcja. Zawiera wszystko co potrzeba, polecam!
 ;
Instrukcja jest OK. Schematy czytelne, opisane niektóre procedury.
;
Instrukcja bardzo czytelna. zawiera co potrzeba. Polecam
;
...instrukcja serwisowa w pełni czytelna i kompletna. Dziękuję!
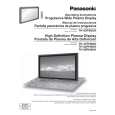
TH-37PH9UK / TH-42PH9UK
9. Disconnect the couplers(P2, P9, P11, P12, P23, P25). 10. Remove the 6 screws ( ) and then remove the P-Board. 11. Remove the each 1 screw ( ) and then remove the Speaker Terminal Black(L, R).
18. Disconnect the couplers(SS23, SS34). 19. Remove the Flexible Cable from the couplers(SS41, SS42, SS43, SS44) 20. Remove the 6 screws and then remove the SS-Board.
12. Disconnect the coupler(D20). 13. Remove the Flexible Cable from the couplers(D31, D32). 14. Remove the 4 screws and then remove the D-Board.
21. Remove the Flexible Cable from the coupler(C12). 22. Remove the 8 screws ( ) and then remove the Flexible Cable from the couplers(CB1, CB2, CB3, CB4). 23. Remove the 4 screws ( ) and then remove the C1-Board.
15. Remove the SU-Board and the SD-Board. (Reference to Removal of the SU-Board and the SD-Board) 16. Remove the 1 screw ( ) and then remove the clamper. 17. Remove the 6 screws ( ) and then remove the SC-Board.
24. Remove the 8 screws ( ) and then remove the Flexible Cable from the couplers(CB5, CB6, CB7, CB8). 25. Remove the 4 screws ( ) and then remove the C2-Board.
27
|