|
Dla tego produktu nie napisano jeszcze recenzji!
 ;
...instrukcja serwisowa w pełni czytelna i kompletna. Dziękuję!
;
Instrukcja Serwisowa jest kompletna i czytelna. Dziękuję!
 ;
Wszystko OK!
Dokumentacja jest czytelna.
Dziękuję.
;
Bardzo dobra jakość skanu, przystępna cena. Instrukcja serwisowa okazała się przydatna przy "reanimowaniu" dwudziestoparoletniego decka, który teraz pięknie gra :)
;
...instruction is ok.
...instrukcja jest ok.
Thanks/Dzięki
3.1.6 Removing the DSP board (See Figs.9 and 10) � Prior to performing the following procedures, remove the top panel and rear cover. (1) From the top side of the DSP board, disconnect the card wires from the connectors CN401 on the DSP board. (See Fig.10) (2) Remove the screw K attaching the DSP board from the section d of the barrier. (See Fig.10) (3) From the back side of the main body, remove the screw L and two screws M attaching the DSP board. (See Fig.9) Reference: � When attaching the DSP board, hang the DSP board on the section d of the barrier. (See Fig.10)
L
M
N
Fig.9
Rear panel
Section d
3.1.7 Removing the tuner (See Figs.9 and 11) � Prior to performing the following procedures, remove the top panel, rear cover and DSP board. (1) From the top side of the tuner, disconnect the card wire from the connector CN1 on the tuner. (See Fig.11) (2) From the back side of the main body, remove the two screws N attaching the tuner. (See Fig.9) (3) Take out the tuner from the main body.
K
CN401
DSP board
Fig.10
Tuner
Fig.11
CN1
(No.MB055)1-9
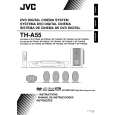
 $4.99 TH-A55 JVC
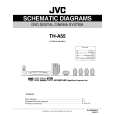
Schematy Zestaw schematów dla tego urządzenia. Plik PDF zawierający schematy będzie dostarczony na Twó… 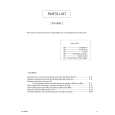 $4.99 TH-A55 JVC
Katalog Części Katalog części w formie pliku PDF. Plik zawiera wykaz części znajdujących się w urządzeniu wr…
|