|
|
|
Kategorie
|
|
Informacje
|
|
Polecamy
|
|
|
 |
|
|
Dla tego produktu nie napisano jeszcze recenzji!
 ;
Bardzo dobra jakość skanu, przystępna cena. Instrukcja serwisowa okazała się przydatna przy "reanimowaniu" dwudziestoparoletniego decka, który teraz pięknie gra :)
;
...instruction is ok.
...instrukcja jest ok.
Thanks/Dzięki
;
Documentation made available quickly and It is good quality. Thanks.
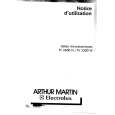
TK-3107
DISASSEMBLY FOR REPAIR
Separating the case assembly from the chassis
1. Remove the two knobs � and three round nuts �. 2. Remove the two screws �. 3. Expand the right and left sides of the bottom of the case assembly, Iift the chassis, and remove it from the case assembly �.
Separating the chassis from the unit
1. Remove the eleven screws �. 2. Remove the solder from the antenna terminal using a soldering iron then lift the unit off �. 3. Remove the two screws � and remove the antenna connector. Note : When reassembling the unit in the chassis, be sure to solder the antenna terminal.
Antenna terminal
4. Taking care not to cut the speaker lead �, open the chassis and case assembly.
Removing the lever
1. Raise the lever on the lower case �, insert a small flat screwdriver into the space between the case and lever, open the case carefully � and lift the lever off. Note : Do not force to separate the case from the lever.
Lever knob Cace assembly
4
|
|
|
> |
|