|
Dla tego produktu nie napisano jeszcze recenzji!
 ;
jedyne do czego mogę mieć zastrzeżenie to jakość zdjęć zawartych w przesłanej instrukcji serwisowej ponieważ są fatalnej jakości, praktycznie nieczytelne. tak poza tym jestem zadowolony to jest to czego szukałem.
 ;
Wszystko w porządku.
Instrukcja czytelna i kompletna.
Dziękuję.
all right!
thank you.
;
Bardzo dobra instrukcja. Zawiera wszystko co potrzeba, polecam!
;
Instrukcja jest OK. Schematy czytelne, opisane niektóre procedury.
;
Instrukcja bardzo czytelna. zawiera co potrzeba. Polecam
Disassembly
V3i
Removing and Replacing the Flip Assembly Cover
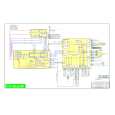
1. 2. 3. Remove the battery cover, battery, SIM, antenna, rear housing, and transceiver board assembly as described in the procedures. Remove the 4 flip assembly screw caps. Use the T-5 driver to remove the 4 T5 screws from the flip assembly (see Figure 11). Retain the screws for re-assembly.
Flip screws
Flip screws
051128o
Figure 11. Removing the Flip Assembly Screws 4. Before removing the flip cover, note the locations of the smart buttons on the sides of the flip assembly.
32
November 18, 2005
6809495A82-A
 $4.99 V3I MOTOROLA
Schematy Zestaw schematów dla tego urządzenia. Plik PDF zawierający schematy będzie dostarczony na Twó…
|