|
|
|
Kategorie
|
|
Informacje
|
|
Polecamy
|
|
|
 |
|
|
Dla tego produktu nie napisano jeszcze recenzji!
 ;
Dobrej jakości skan - wkońcu mogłem poznać wszystkie funkcje tego odtwarzacza - polecam .
;
Gruba instrukcja - poprostu wszystko co potrzreba - polecam .
RECORDING
COUNT.RST F.ADV CLR/RST
3 4 5 6 7 8 9 10 11 12 13 14 15 16 17 18 19
Press � to select the input source. pressing to � or � button AV2 I.SELECT theselect the AV1 oror input sources. Press � to select the recording day. Select the required day by pressing the � or � button. Select the required station by
�� ¥� OK
END: MENU
MENU
3
1 -----PROG PR DAY
Press the � or � buttons to select the required programme. Press the ¥ or � button to select and change any values as required. For more details, refer to the previous page. On completion, press. MENU.
MO 1 ----------------
12:00�12:50 SP --:--�--:-----:--�--:-----:--�--:-----:--�--:-----:--�--:----
1/JAN MON 21:28 START�STOP V/P ON -
COUNT.RST
4
F.ADV CLR/RST
5 1
CURSOR
�� ¥� DELETE:CLR/RST
MENU
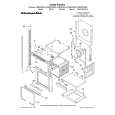
Press � to select the recording start time. Select the required hour value by pressing the � or � button. Press � to select the minutes. Select the required minute value by pressing the � or � button. Press � to select the recording end time. Select the required recording end time by pressing the � or � button, following the same procedure as when selecting the recording start time. Press � to select the recording speed (AUTO/SP/LP). Press the � or � button to switch between the AUTO, SP (standard Play), LP (Long Play) recording speeds. Press � to select the VPS or PDC (V/P) recording mode. Press the � or � button to toggle between the VPS or PDC mode (marked ON ) and the non-VPS/PDC mode (marked -). To set another timer programme, press � button to go to next line and follow steps 3 to 16. When you have finished, press the MENU button. Press the two TIMER button to activate the timer. Note : If you wish to turn the timer off any reason simply press the two TIMER button again. Result : Before starting recording, the VTR compares the timer duration with the remaining time on the cassette. You can cancel any programmes that are : o Incorrect o No longer required
OK
AUDIO
Cancelling a Preset Recording
Press MENU on the remote control. Result : The programming menu is displayed. Press the OK button to select this option . Result : The TIMER PROGRAMMING menu is displayed.
PROG 1/JAN MON 21:28 PR DAY START�STOP V/P 1 MO 1 12:00�12:50 SP ON
CURSOR
2
PROG
OPTIONS
INSTALL
Note: Auto Tape Speed Select The VTR�s Auto Tape Speed Select� function compares the duration of the timer recording to the actual recording time remaining on the tape loaded. If there is insufficient tape to complete a timer recording in AUTO mode, the VTR automatically switches to LP mode to record the whole programme. E.g. If there is a one hour Timer recording in AUTO mode to be started, and only 40 minutes tape remaining, the VTR will record in SP for 20 minutes and switch to complete the remaining 40 minutes in LP mode.
CLOCK
TIMER PROGRAMMING
BONUS LANG
�� ¥� OK
END: MENU
------
----------------
--:--�--:-----:--�--:-----:--�--:-----:--�--:-----:--�--:----
-
�� ¥� DELETE:CLR/RST
MENU
3 4 5
Select the programme to be cancelled by pressing the � or � button. Press the CLR/RST button to cancel the selected programme. Result : All the recording information is deleted and the broadcast will not be recorded. On completion, press. MENU.
26
27
RECORDING
2-12 Toshiba
66
Reference Information
RECORDING
66
RECORDING
Using the TIMER Programming Feature
The TIMER Programming feature allows you to preset the VTR to record a programme up to one month before that programme is to be broadcast. Up to six programmes can be preset.
Checking a Preset Recording
You can check your preset recordings: o When you have finished presetting the VTR o If you have forgotten which programmes will be recorded o Before the VTR enters the timer standby mode
Using the TIMER Programming Feature
Checking a Preset Recording
1 2
DISPLAY
Press MENU on the remote control. Result : The programming menu is displayed. Press the OK button to select this option. Result : The TIMER PROGRAMMING menu is displayed.
1 2
DISPLAY
Press MENU on the remote control. Result : The programming menu is displayed.
Press the OK button to select this option . Result : The TIMER PROGRAMMING menu is displayed.
PROG
PROG
OPTIONS
INSTALL
PROG
OPTIONS
INSTALL
CLOCK
BONUS
LANG
CLOCK
TIMER PROGRAMMING
�� ¥� OK
BONUS
LANG
TIMER PROGRAMMING END: MENU
PR 1 ------
DAY MO 1 ----------------
1/JAN MON 21:28 START�STOP V/P 12:00�12:50 SP ON --:--�--:---- --:--�--:---- --:--�--:---- --:--�--:---- --:--�--:---- -
�� ¥� DELETE:CLR/RST
 $4.99 V621UK TOSHIBA
Schematy Zestaw schematów dla tego urządzenia. Plik PDF zawierający schematy będzie dostarczony na Twó…
|
|
|
> |
|