|
|
|
Kategorie
|
|
Informacje
|
|
Polecamy
|
|
|
 |
|
|
Dla tego produktu nie napisano jeszcze recenzji!
 ;
...instruction is ok.
...instrukcja jest ok.
Thanks/Dzięki
;
Documentation made available quickly and It is good quality. Thanks.
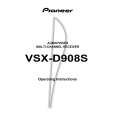
VSX-29TX, VSX-27TX, VSX-26TX, VSX-24TX, VSX-D908S
Basic Receiver LCD Screens
Receiver MAIN Screen
1 0 9
Receiver
DSP MAIN STEREO EFFECT SUB
8 MIDNIGHT button 2
Switches the MIDNIGHT LISTENING mode on or off.
9 DSP button
Press repeatedly to select a DSP sound mode.
0 STEREO button
Press to select the STEREO sound mode. In this mode, sound comes from the front (left and right) speakers only.
/ dts
THX ADVANCED STANDARD THEATER DIRECT LOUDNESS MIDNIGHT DIGITAL NR
8
SIGNAL SELECT
3 4
Receiver SUB Screen
1
Receiver
MAIN SUB
2
7 65 1 Receiver MAIN button
Press this button to select the main receiver screen (above) when the remote control is on the sub receiver screen.
7 6 5
TAPE 2 EXTERNAL MONITOR 5.1CH BASS INPUT ATT. TREBLE
2 EFFECT +/- button
Use these buttons to increase or decrease the amount of effect applied in a DSP or Advanced Theater mode. When the amount of effect is increased in a DSP/ Advanced Theater mode the characteristics of that mode become stronger and more noticeable. The scale ranges from 10-90 with 70 as the default setting. First turn on the DSP/Advanced Theater mode you want (by pressing the DSP/Advanced Theater button until you get the mode) and then increase or decrease the amount of effect.
CH LEVEL SYSTEM SETUP
4 1 Receiver SUB button
3
Press this button to select the sub receiver screen (above) when the remote control is on the main receiver screen.
2 BASS & TREBLE (+/�) buttons
Use to adjust the high and low frequencies (STEREO mode only).
3
/dts buttons
Press these buttons to put the receiver in the selected surround sound mode. For more information on the modes
3 SYSTEM SET UP button
Use to set up the speaker and sound systems.
4 SIGNAL SELECT button
Press SIGNAL SELECT repeatedly to select one of the following: ANALOG : To select an analog signal. DIGITAL : To select a digital signal (DVD/LD, TV/SAT, CD, MD/TAPE 1, VCR 1, VCR 2). AC-3 RF : To select an AC-3 RF signal (DVD/LD, TV/ SAT, VCR 1, VCR 2). AUTO : This is the default. If there are both analog and digital input signal, the receiver automatically selects digital.
4 CHANNEL LEVEL button
Use this feature to adjust the level of individual speakers during playback of a source.
5 INPUT ATT button
Use to lower the input level of an analog signal that is too powerful, thus causing the receiver to distort (the overload indicator will light furiously).
6 EXTERNAL 5.1 CHANNEL button
Use to hook up an external component that can decode other types of signals and input them into the VSX-29TX.
5 DIRECT button
Switches DIRECT playback on or off. Use to bypass the tone controls and channel level for the most accurate reproduction of a program source. It will automatically put the receiver in STEREO mode for the function being used for DIRECT playback.
7 TAPE 2 MONITOR button
Selects the tape deck (or MD recorder, etc.) connected to the TAPE 2 MONITOR inputs/outputs. Allows monitoring of a recording as it's being made.
6 LOUDNESS button
Switches the LOUDNESS mode on or off.
7 DIGITAL NR button
Switches the DIGITAL NR on or off (STEREO mode only).
108
|
|
|
> |
|