|
|
|
Kategorie
|
|
Informacje
|
|
Polecamy
|
|
|
 |
|
|
Dla tego produktu nie napisano jeszcze recenzji!
 ;
Dokładna dokumentacja, pomogła w szybkiej naprawie telewizora. Dziękuję!
 ;
jedyne do czego mogę mieć zastrzeżenie to jakość zdjęć zawartych w przesłanej instrukcji serwisowej ponieważ są fatalnej jakości, praktycznie nieczytelne. tak poza tym jestem zadowolony to jest to czego szukałem.
;
Wszystko w porządku.
Instrukcja czytelna i kompletna.
Dziękuję.
all right!
thank you.
;
Bardzo dobra instrukcja. Zawiera wszystko co potrzeba, polecam!
;
Instrukcja jest OK. Schematy czytelne, opisane niektóre procedury.
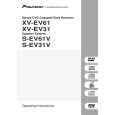
Sub Woofer
Front
Surround
Center
ORDER NO.
RRV2776
SPEAKER SYSTEM
S-EV61V
S-EV61V
S-EV61V
FOR PRECAUTION OF REASSEMBLY AND DISASSEMBLY
(Front SP)
The grille is attached to the cabinet by catches. Detach by pulling it toward you. The woofer is attached to the cosmetic baffle by 4 internal screws. The cosmetic baffle is atached to the cabinet by 4 external screws and 2 bosses. To detach it, first insert a sharppointed tool like an eyeleteer into the catch and push up. Next unfasten screws for the cosmetic baffle and pry it open by inserting a flat blade screwdriver between the cosmetic baffle and the cabinet. Then unfasten those screws. When attaching the woofer, face its terminal downward. When attaching the cosmetic baffle, fit its boss into the hole on the cabinet. The tweeter is attached to the cosmetic baffle by 2 internal screws. The cosmetic baffle is atached to the cabinet by 4 external screws and 2 bosses. To detach it, perform same as the woofer.
XJI/E
XJI/NC
(Sub Woofer)
The woofer is attached to the back board by 4 external screws. To detach it, unfasten those screws. The input terminal is attached to the back board of the cabinet together with the adhesive by press-fitting. To detach the input terminal, pry it open by inserting a flat blade screwdriver into the upper and lower slot of the input terminal. To attach the input terminal, replace it on the back board of the cabinet correctly together with the adhesive by press-fitting. (The red terminal is right-side.) The cosmetic baffle is attached to the baffle of the cabinet by press-fitting. To detach the cosmetic baffle, pry it open by inserting a flat blade screwdriver into the lower slot of it. To attach the cosmetic baffle, replace it on the baffle of the cabinet by press-fitting.
(Center SP and Surround SP)
The grille assy is attached to the cabinet by external screws (8 screws for center SP, 4 screws for surround SP) from backside. The Speaker is attached to the grille by 4 internal screws. To detach it, first unfasten screws for the grille and the cabinet. Then unfasten those screws.When attaching it, face its terminal horizontal. When attaching the grille after connecting the cord, face its terminal toward the cord of the cabinet.
4-1, Meguro 1-chome, Meguro-ku, Tokyo 153-8654, Japan PIONEER ELECTRONICS (USA) INC. P.O. Box 1760, Long Beach, CA 90801-1760, U.S.A. PIONEER EUROPE NV Haven 1087, Keetberglaan 1, 9120 Melsele, Belgium PIONEER ELECTRONICS ASIACENTRE PTE. LTD. 253 Alexandra Road, #04-01, Singapore 159936
PIONEER CORPORATION
PIONEER CORPORATION 2003
T � ZZP JULY 2003 Printed in Japan
|
|
|
> |
|