|
|
|
Kategorie
|
|
Informacje
|
|
Polecamy
|
|
|
 |
|
|
Dla tego produktu nie napisano jeszcze recenzji!
 ;
Szybko, sprawnie i tanio. Serwis godny polecenia. Będę polecał innym
 ;
Ogólnie jest OK, z wyjątkiem obrazu płyty głównej, który jest miejscami mało czytelny, ale można sobie poradzić.
;
Dokładna dokumentacja, pomogła w szybkiej naprawie telewizora. Dziękuję!
;
jedyne do czego mogę mieć zastrzeżenie to jakość zdjęć zawartych w przesłanej instrukcji serwisowej ponieważ są fatalnej jakości, praktycznie nieczytelne. tak poza tym jestem zadowolony to jest to czego szukałem.
;
Wszystko w porządku.
Instrukcja czytelna i kompletna.
Dziękuję.
all right!
thank you.
REA Program
Capacitor Removal - 7
Removal by Desoldering
This is an alternate method of removing capacitor C102.
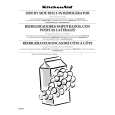
Desolder Points
1 2
Locate the two points on the solder-side of the board that correspond to capacitor C102. If you are using a vacuum-type soldering tool, apply heat to each of the points, suck the solder from the surface, and pull the capacitor from the board.
3
If you are not using a vacuum-type soldering tool, apply enough heat to each of the points so that you can gently loosen the capacitor. Continue to rock the capacitor until you can easily remove it from the board.
DC Controller Board (Solder Side)
Note: If you are unable to remove the capacitor, you can
order a replacement board that has no capacitor C102. The part number for the board is 661-1441.
|
|
|
> |
|