|
|
|
Kategorie
|
|
Informacje
|
|
Polecamy
|
|
|
 |
|
|
Dla tego produktu nie napisano jeszcze recenzji!
 ;
Dokładna dokumentacja, pomogła w szybkiej naprawie telewizora. Dziękuję!
 ;
jedyne do czego mogę mieć zastrzeżenie to jakość zdjęć zawartych w przesłanej instrukcji serwisowej ponieważ są fatalnej jakości, praktycznie nieczytelne. tak poza tym jestem zadowolony to jest to czego szukałem.
;
Wszystko w porządku.
Instrukcja czytelna i kompletna.
Dziękuję.
all right!
thank you.
;
Bardzo dobra instrukcja. Zawiera wszystko co potrzeba, polecam!
;
Instrukcja jest OK. Schematy czytelne, opisane niektóre procedury.
Option -05 IEEE-488 Interface Performance Testing
8
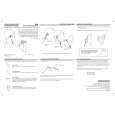
6. Remove the IEEE-488 PCA, disengaging the assembly from both the small slot in the side of the meter and the plastic standoff at the front corner of the assembly.
8-12. Installing the IEEE-488 Interface Option Use the following procedure to install the IEEE-488 Interface Option.
1. Turn the meter off, and unplug the power connection. 2. Check that the plastic standoff remains in the appropriate hole in the meter PCA (narrow end of the standoff down; see Figure 8-3). 3. If necessary, install the two ribbon cables on the IEEE-488 PCA. Each cable fits in only one socket and in only one direction. Make sure the cables lock firmly in place. 4. Attach opposite ends of the ribbon cables onto the Fluke 45 Main PCA. 5. Install the IEEE-488 PCA in the Fluke 45 with the dual ribbon cables facing the front of the meter. The IEEE-488 PCA slips into the small slot in the side of the meter. The end of the plastic standoff fits into the hole in the IEEE-488 PCA. Make sure the IEEE-488 PCA is firmly gripped against the retainer on the standoff. The rear of the IEEE-488 PCA should rest upon the support just forward of the transformer. 6. Secure the rear of the IEEE-488 PCA with the panhead Phillips screw. 7. Connect the 24-line cable assembly to the IEEE-488 PCA. (See Figure 8-2.) 8. Reinstall the meter case so it seats properly in the front panel. Attach the rear bezel with the two panhead Phillips screws, and secure the case with the flathead Phillips screw in the bottom.
8-13. Performance Testing
Use the performance test program in Figure 8-1 to verify operation of the IEEE-488 Interface. This program is written for use with the Fluke 182A Instrument Controller and its interpreted BASIC language. The program may be adapted to the language of any IEEE-488 controller. This performance test communicates to a meter that has been configured for IEEE-488 operation at address 0. Lines 160 and 170 initialize the IEEE-488 bus and send a selective device clear to the meter. A multiple byte command is sent to the meter (by line 190) to clear the meter status. Another command sequence (including a query) is sent to the meter by line 210; the meter asserts Service Request (SRQ) to signal that a response is available. Lines 530 through 560 first poll the meter for status, then input the response from the meter. Lines 230 through 270 test for proper operation and print the results.
8-9
|
|
|
> |
|