|
Dla tego produktu nie napisano jeszcze recenzji!
 ;
jedyne do czego mogę mieć zastrzeżenie to jakość zdjęć zawartych w przesłanej instrukcji serwisowej ponieważ są fatalnej jakości, praktycznie nieczytelne. tak poza tym jestem zadowolony to jest to czego szukałem.
 ;
Wszystko w porządku.
Instrukcja czytelna i kompletna.
Dziękuję.
all right!
thank you.
;
Bardzo dobra instrukcja. Zawiera wszystko co potrzeba, polecam!
;
Instrukcja jest OK. Schematy czytelne, opisane niektóre procedury.
;
Instrukcja bardzo czytelna. zawiera co potrzeba. Polecam
and J-P.C.Board remain).
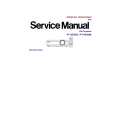
6.8. Removal of B/Q-Module 1. Remove the upper case and A-P.C.Board block according to the steps 1 through 3 in the section 6.3. "Removal of A-P.C.Board". 2. Unscrew the 2 screws and remove the lamp unit terminal. 3. Unscrew the 3 screws. 4. While pressing to close the cap of the resinous stand, remove the B/Q-Module.
6.9. Removal of P-Module 1. Remove the upper case and A-P.C.Board block according to the steps 1 through 3 in the section 6.3. "Removal of A-P.C.Board". 2. Unscrew the 3 screws and remove the intake duct block. 3. Unscrew the 2 screws and remove the lamp unit terminal. 4. Unscrew the 2 screws and remove the power block (P-, B/QModules block).
15
|