Nie masz w koszyku żadnych produktów
 
English Polski Spanish 
Szukaj instrukcji do
 

(e.g. AA-V20EG JVC, ZX-7 Sony )
PayPal 1000+ rating Secure, Encrypted Checkout.
 
Kto jest w sklepie?
Sklep przegląda 5568 gości 
Support Info
ELECTROLUX
Pierwszy punkt kontaktu:
Wszelkie znaki towarowe są własnością ich właścicieli.
Kategorie
Informacje
Polecamy
Strona główna >> AEG >> ZD699ALU Instrukcja Obsługi
 
 0 szt. w koszyku 

AEG ZD699ALU
Instrukcja Obsługi


Tweetnij o tym produkcie a dostaniesz $1.00 rabatu!
  • Plik do pobrania
  • Format PDF
  • Kompletna instrukcja
  • Język: English
Cena: $4.99

Opis AEG ZD699ALU Instrukcja Obsługi

Kompletna instrukcja obsługi w formie pliku PDF. Plik PDF zostanie dostarczony na Twój adres email po jego zakupieniu.

Instrukcje obsługi (czasami nazywane także podręcznikiem użytkownika) opisuja funkcje i sposób działania danego produktu.

Instrukcja jest dostępna w następujących językach: English

Plik nie jest jeszcze gotowy
Musisz najpierw dokonać zakupu.

Recenzje produktu
Dla tego produktu nie napisano jeszcze recenzji!

Tekstowy podgląd strony 30 (kliknij aby zobaczyć)
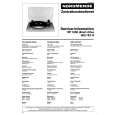
The furniture door plinth
The door on this appliance is designed for the overlay of a door plinth having the following dimensions: Width: Height: Thickness: 596 mm 50 mm (min) - 120 mm (max) 20 mm max

The panel height should be no more than indicated, otherwise complete opening of the door will no longer be possible as the panel hits against the dishwasher plinth.

II122

Mounting the infill panel
1. Drill the panel with a � 2 x 12 bit according to the dimensions indicated in the figure. 2. Fix the panel to the cross bar provided with 2 screws 3.5 x 16. 3. Fix the cross bar to the dishwasher door with 2 screws 3.5 x 16 after having inserted the two hooks of the cross bar on the lower section of the door.

458
II69

120: 50 14 575

2 220 3
II70

Fixing to the adjacent units
To prevent the dishwasher tilting, it must be secured to either the worktop or adjacent kitchen cabinet/wall using the brackets supplied. Insert the two fixing brackets into the slots provided in the top front part of the dishwasher as shown in the figure. Secure the brackets to the adjacent units with the 3.5 x 16 screws using the upper or the side holes.

The appliance must be secured to the underside of the worktop using the brackets provided. Failure to do this could cause damage or injury. Attention! The sides of the dishwasher must never be drilled to prevent damage to hydraulic components.
II54

30

820

INS66en

Klienci kupując ten produkt kupili także

$4.99

SX-K700 TECHNICS
Instrukcja Obsługi

Kompletna instrukcja obsługi w formie pliku PDF. Plik PDF zostanie dostarczony na Twój adres email…

$4.99

CJ-V51 PIONEER
Instrukcja Serwisowa

Kompletna instrukcja serwisowa w formie pliku PDF. Instrukcje serwisowe zazwyczaj zawierają schemat…

$4.99

GRAND PRIX ELECTRONIC 754 BECKER
Instrukcja Serwisowa

Kompletna instrukcja serwisowa w formie pliku PDF. Instrukcje serwisowe zazwyczaj zawierają schemat…

$4.99

SX-PR602 TECHNICS
Instrukcja Serwisowa

Kompletna instrukcja serwisowa w formie pliku PDF. Instrukcje serwisowe zazwyczaj zawierają schemat…

$4.99

EV-S1000E SONY
Instrukcja Obsługi

Kompletna instrukcja obsługi w formie pliku PDF. Plik PDF zostanie dostarczony na Twój adres email…

$4.99

GRAND PRIX ELECTRONIC 780 BECKER
Instrukcja Serwisowa

Kompletna instrukcja serwisowa w formie pliku PDF. Instrukcje serwisowe zazwyczaj zawierają schemat…

$4.99

AG7330 PANASONIC
Instrukcja Serwisowa

Kompletna instrukcja serwisowa w formie pliku PDF. Instrukcje serwisowe zazwyczaj zawierają schemat…

$4.99

EVO-9850 VOLUME 1 SONY
Instrukcja Serwisowa

Kompletna instrukcja serwisowa w formie pliku PDF. Instrukcje serwisowe zazwyczaj zawierają schemat…
>
Parse Time: 0.179 - Number of Queries: 124 - Query Time: 0.043