GZ-MG67EY Ilość: 1
$4.99
» Pokaż Szczegóły
GRDV3000SH Ilość: 1
$4.99
» Pokaż Szczegóły
AX3215/98 Ilość: 1
$4.99
» Pokaż Szczegóły
CON 915 ME Ilość: 1
$4.99
» Pokaż Szczegóły
7KCD250T0 Ilość: 1
$4.99
» Pokaż Szczegóły
KGRC707LBT0 Ilość: 1
$4.99
» Pokaż Szczegóły
HP3150-01/A Ilość: 1
$4.99
» Pokaż Szczegóły
FO-200 Ilość: 1
$4.99
» Pokaż Szczegóły
10079328 MWO 140 W Ilość: 1
$4.99
» Pokaż Szczegóły
D-R1SF REV1 Ilość: 1
$4.99
» Pokaż Szczegóły
NVEX3EG NVEX3B Ilość: 1
$4.99
» Pokaż Szczegóły
E30512-4-W DE R07 Ilość: 1
$4.99
» Pokaż Szczegóły
FL 5085/A Ilość: 1
$4.99
» Pokaż Szczegóły
AV28WFT1... Ilość: 1
$4.99
» Pokaż Szczegóły
MT 224/BLUE Ilość: 1
$4.99
» Pokaż Szczegóły
GT2103 Ilość: 1
$4.99
» Pokaż Szczegóły
PT-L735U Ilość: 1
$4.99
» Pokaż Szczegóły
MP-XP731GB Ilość: 1
$4.99
» Pokaż Szczegóły
CL447AV-031244715201 Ilość: 1
$4.99
» Pokaż Szczegóły
EW1100T Ilość: 1
$4.99
» Pokaż Szczegóły
ARC 1842 Ilość: 1
$4.99
» Pokaż Szczegóły
CTV552X-12V Ilość: 1
$4.99
» Pokaż Szczegóły
GSIE 6484 IN Ilość: 1
$4.99
» Pokaż Szczegóły
S601/90A + TUBI NERO Ilość: 1
$4.99
» Pokaż Szczegóły
PP-2449V-C Ilość: 1
$4.99
» Pokaż Szczegóły
AKZ 401 IX Ilość: 1
$4.99
» Pokaż Szczegóły
DP 3220 Ilość: 1
$4.99
» Pokaż Szczegóły
SCC-700C Ilość: 1
$4.99
» Pokaż Szczegóły
DS-3010C Ilość: 1
$4.99
» Pokaż Szczegóły
TYPE 2252 Ilość: 1
$4.99
» Pokaż Szczegóły
BM70TM53 Ilość: 1
$4.99
» Pokaż Szczegóły
EMHP 4466/AL Ilość: 1
$4.99
» Pokaż Szczegóły
LPR273 Ilość: 1
$4.99
» Pokaż Szczegóły
DU925SCGB0 Ilość: 1
$4.99
» Pokaż Szczegóły
VL-E30S Ilość: 1
$4.99
» Pokaż Szczegóły
DVDR7310H/31 Ilość: 1
$4.99
» Pokaż Szczegóły
ET18JKYSG07 Ilość: 1
$4.99
» Pokaż Szczegóły
RBD245PDT11 Ilość: 1
$4.99
» Pokaż Szczegóły
TD6120/GM101P Ilość: 1
$4.99
» Pokaż Szczegóły
W sumie: $194.61
 
English Polski Spanish 
Szukaj instrukcji do
 

(e.g. AA-V20EG JVC, ZX-7 Sony )
PayPal 1000+ rating Secure, Encrypted Checkout.
 
Kategorie
Informacje
Polecamy
Strona główna >> SONY >> CCDTRV208E Instrukcja Serwisowa
 
 39 szt. w koszyku 

SONY CCDTRV208E
Instrukcja Serwisowa


Tweetnij o tym produkcie a dostaniesz $1.00 rabatu!
  • Zawiera schematy
  • Plik do pobrania
  • Format PDF
  • Kompletna instrukcja
  • Język: English
Cena: $4.99

Opis SONY CCDTRV208E Instrukcja Serwisowa

Kompletna instrukcja serwisowa w formie pliku PDF. Instrukcje serwisowe zazwyczaj zawierają schematy, diagramy drukowanych obwodów (PCB), schematy połączeń, schematy blokowe oraz katalog części. Instrukcje serwisowe są wykorzystywane glównie przez osoby naprawiające uszkodzony sprzęt.

Jeśli chcesz się dowiedzieć jak się obsługuje Twój telewizor, magnetowid, odtwarzacz mp3 itp. powinieneś raczej szukać instrukcji obsługi

Instrukcja jest dostępna w następujących językach: English

Plik nie jest jeszcze gotowy
Musisz najpierw dokonać zakupu.

Recenzje produktu
Dla tego produktu nie napisano jeszcze recenzji!
Recenzje innych produktów
 KPE61MN11 SONY Instrukcja Serwisowa by Grzegorz Zawadzki;
Dokładna dokumentacja, pomogła w szybkiej naprawie telewizora. Dziękuję!
 RCM70L/LB JVC Instrukcja Serwisowa by Damian Mazek;
jedyne do czego mogę mieć zastrzeżenie to jakość zdjęć zawartych w przesłanej instrukcji serwisowej ponieważ są fatalnej jakości, praktycznie nieczytelne. tak poza tym jestem zadowolony to jest to czego szukałem.
 SA-A30E AIWA Instrukcja Serwisowa by Adam Grążka;
Wszystko w porządku. Instrukcja czytelna i kompletna. Dziękuję. all right! thank you.
 KX990SR KENWOOD Instrukcja Serwisowa by Viktor Kapeć;
Bardzo dobra instrukcja. Zawiera wszystko co potrzeba, polecam!
 TA2760 ONKYO Instrukcja Serwisowa by Viktor Kapeć;
Instrukcja jest OK. Schematy czytelne, opisane niektóre procedury.

Tekstowy podgląd strony 196 (kliknij aby zobaczyć)
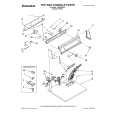
4-13. TG1 Arm, Reel Table (S) Assembly, Push Switch (3Key)
1. Removal procedure
1) 2) 3) 4) 5) 6) 7) 8) 9) Remove the TG1 arm spring 1.
Note: Take note of the position where the spring has been hooked.

2. Attachment procedure
Attach the push switch (3key) qa to the cassette guide T qs with the two claws 0. 2) Attach the cassette guide T qs to the notch of the LS chassis block assembly with the two claws 9. 3) Solder the cassette guide T qs to the LS-057 board at the four locations. 4) Attach the lock guide 7. 5) Attach the BT band assembly 6. 6) Check the location of the reel table S 4. Then, rotate the S ratchet arm 3 in the direction of the arrow A and insert the band of the BT band assembly 6 into the groove on the side. 7) Attach the BT band assembly to the TG1 arm 2 and attach it to the mechanism chassis block assembly. 8) Check the shape of the hook of the TG1 arm spring 1. Hook one end of the spring on the TG1 arm 2. Then, hook the other end of the spring on the same location of the LS chassis block assembly where you have taken note when the spring is removed. 9) Attach the RVS arm spring. 10) Check the TG1 back-tension. (Refer to 5-1.)
Note: The BT band assembly 5 must be completely inserted into the groove on the side of the reel table (S) 4.

1)

Remove the TG1 arm 2. Open the claw of the reel table (S) assembly 4 in the directions of the arrows B and C and remove the reel table S assembly. Remove the RVS arm spring 5. Rotate the S ratchet arm 3 in the direction of the arrow A and remove the BT band assembly 6. Remove the lock guide 7. Remove the four solderings of the LS-057 board. Remove the two claws 9 of the cassette guide T qs from the notch of the LS chassis. Remove the push switch (3key) qa by releasing the two claws of the cassette guide T qs.

B

4 Reel table (S) assembly

Check the location of the reel table (S) assembly.
Reel table (S) assembly is at right angles. Thin

Open the claw of the reel table S in the directions of the arrows B and C.

C

7 Lock guide

qa Push switch (3key) (REC proof) 2 TG1 arm

When attaching it, insert it under the LS chassis assembly.
6 BT band assembly Never coat grease, never attach any

foreign materials nor bend the assembly. Fit here.
5 RVS arm spring 1 TG1 arm spring qs Cassette guide T

9 Two claws

Reel table (S) assembly

Double-hook side
0 Two claws 8 Remove the four solderings

BT band assembly

RVS arm spring Double-hook side TG1 arm TG1 arm spring

Mechanism status before removing the parts.
A 3 Rotate the S ratchet arm in the direction of the arrow A.

When attaching it, coat the hatched portion with grease.

Fig. 4-13.

� 26 �

Klienci kupując ten produkt kupili także

$4.99

SX-K700 TECHNICS
Instrukcja Obsługi

Kompletna instrukcja obsługi w formie pliku PDF. Plik PDF zostanie dostarczony na Twój adres email…

$4.99

CJ-V51 PIONEER
Instrukcja Serwisowa

Kompletna instrukcja serwisowa w formie pliku PDF. Instrukcje serwisowe zazwyczaj zawierają schemat…

$4.99

GRAND PRIX ELECTRONIC 754 BECKER
Instrukcja Serwisowa

Kompletna instrukcja serwisowa w formie pliku PDF. Instrukcje serwisowe zazwyczaj zawierają schemat…

$4.99

SX-PR602 TECHNICS
Instrukcja Serwisowa

Kompletna instrukcja serwisowa w formie pliku PDF. Instrukcje serwisowe zazwyczaj zawierają schemat…

$4.99

EV-S1000E SONY
Instrukcja Obsługi

Kompletna instrukcja obsługi w formie pliku PDF. Plik PDF zostanie dostarczony na Twój adres email…

$4.99

GRAND PRIX ELECTRONIC 780 BECKER
Instrukcja Serwisowa

Kompletna instrukcja serwisowa w formie pliku PDF. Instrukcje serwisowe zazwyczaj zawierają schemat…

$4.99

AG7330 PANASONIC
Instrukcja Serwisowa

Kompletna instrukcja serwisowa w formie pliku PDF. Instrukcje serwisowe zazwyczaj zawierają schemat…

$4.99

MECABLITZ 60 CT4 METZ
Instrukcja Serwisowa

Kompletna instrukcja serwisowa w formie pliku PDF. Instrukcje serwisowe zazwyczaj zawierają schemat…
>
Parse Time: 0.607 - Number of Queries: 278 - Query Time: 0.304